Mandi Gubler of Vintage Revivals gives her parents’ 36-year old bathroom a beautiful makeover using Delta UPstile and other Delta offerings available at The Hope Depot. Read below to find out how she transformed this space!
Renovating a 36 Year Old Bathroom with Delta UpStile
I am so excited to be sharing my parents’ bathroom remodel! Believe me when I say, this thing has be 36 years in the making. You read that right, for the last 36 years this bathroom has remained completely unchanged and I couldn’t wait to get my hands on it!
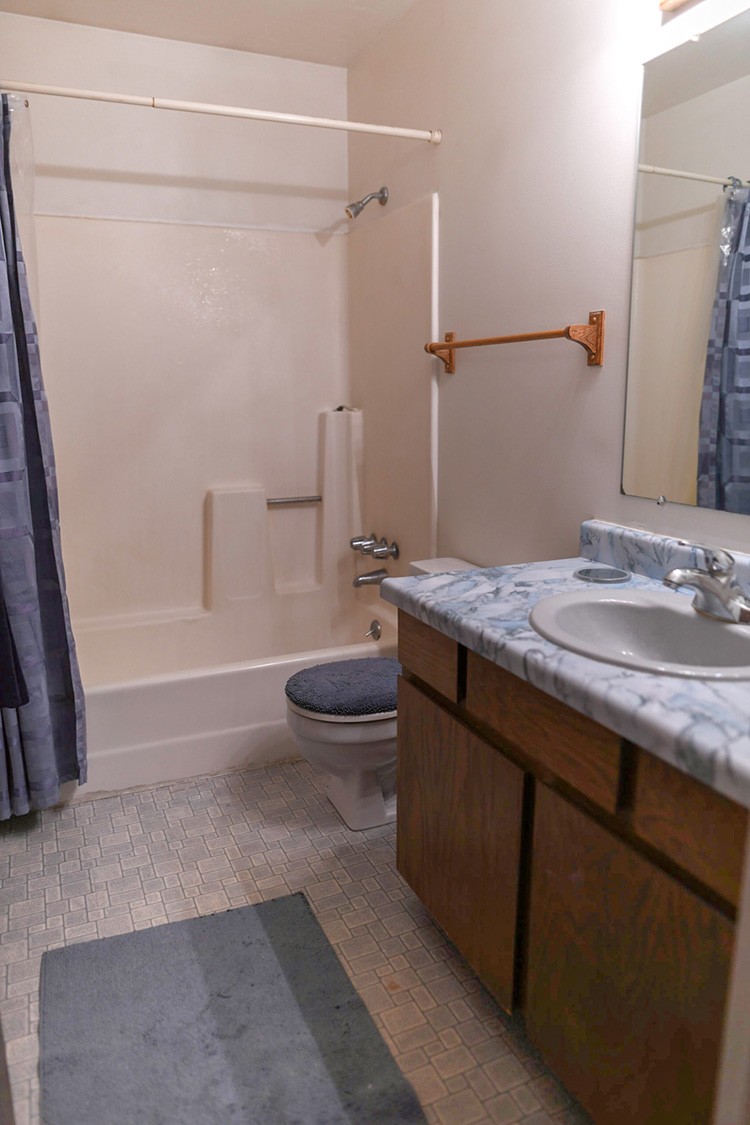
Taking on a bathroom renovation can be very daunting. Especially if you are like us and planning to DIY it. There are a lot of things that are easy and quick updates, stuff like repainting or changing out the lighting. But when you get into the bigger stuff, like replacing a shower it can be cause for pause. But like always, The Home Depot has got you covered.
Traditionally there are 2 camps in the shower department. Team Tile and Team Surround (annnnd for the record I would just like to state that I am Team Edward.) So what’s the difference?
Tile Showers
Tile is great because it’s fully customizable, but it requires extensive waterproofing and is a time consuming installation. Tile usually costs more and is associated with a more custom finish. In my opinion, if you’re new to tiling, a shower is not a great place to start.
 Shower Surrounds
Shower Surrounds are pretty much the exact opposite. Being full wall units, they only require a small amount of waterproofing along the seams, and they are easier to install, but they aren’t customizable and tend to be associated with builder grade finishes.
 Now You Can Have Both!!
With their UpStile line, Delta took the best of both worlds and created a semi-customizable surround. The panels are moulded to look like traditional subway tile with white grout and they have a channel in them where you can set real tile as an accent! Guys!! Anything your little heart desires! Though I would love to offer the advice of using white grout on the accent tile to tie it in with the faux grout on the surround. I used a great faceted diamond pattern that I found on homedepot.com.
Installation Tips
Installation was pretty painless, I’ve got tips to help you with your install!
Measurements
The first being measurements. As you are measuring for your new UpStile, keep in mind that it needs to go underneath the drywall. I may have had a few sleepless nights before we started install because WHAT IF THE MEASUREMENTS ARE WRONG!? thankfully they weren’t, but that’s never a fun fear to have grip you at 2 am.
Motivation
Next tip is more of an emotional one, take a shower before you start demo! Once you’ve ripped out your old tub, there is no going back folks. If this is the only shower in your home, you’ve got to get to work or else you’re going to be kitchen sink bathing until it’s back in.
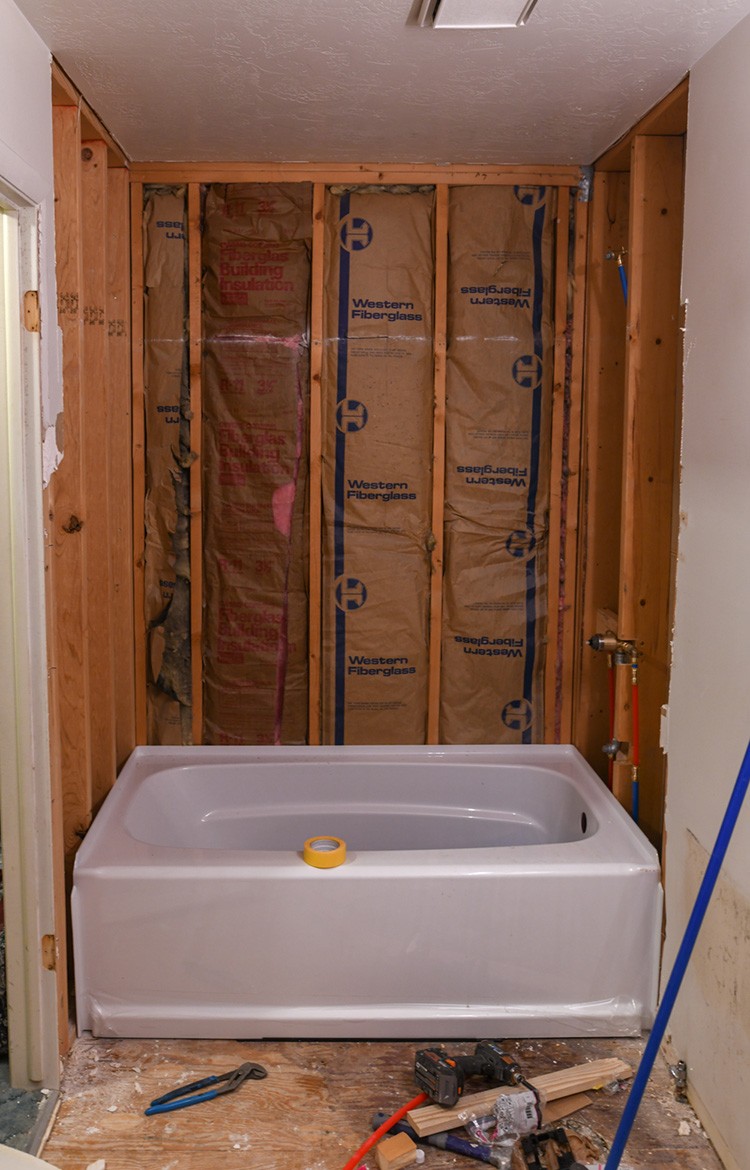 Set Your Tub on a Level Surface
Once we had the old tub demoed, we brought in the new one and it was easier to set than I would’ve thought. I was having Friends “Pivot! Pivot!” flashbacks. One of the biggest mistakes that I think can be made is not setting your tub on a level surface. This is SO important because if the base isn’t level, then that walls wont be level and the shower doors wont be level (you get where this is going, right?) Make sure that your tub is level!
Follow the Instructions (for real!)
Tip #3 is to follow the instructions that Delta sends to a T. They are the most complete and easy to comprehend installation instructions that I have ever found, not just for the UpStile, but for all of the faucets and mirror as well. In fact as I’m writing this post and coming up with tips to share I keep deleting them because I realize that they are not in fact tips, but really brilliant insight that came in the instructions! (Also I’m super aware that reading instructions is not a tip, but if there is anyone in your life like my husband, they need all of the reminders they can get.)
 Painters Tape is your BFF
As you’re caulking the seams, place painters tape on either side of the crack. Place and smooth your caulk, and then remove the p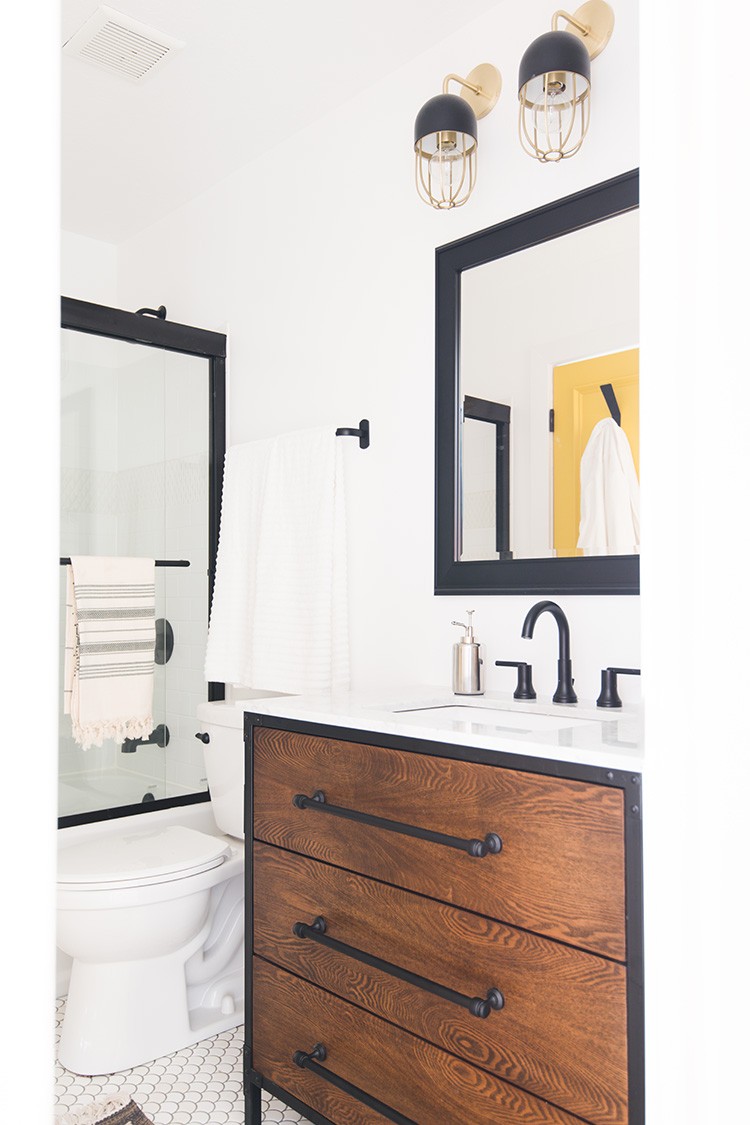 ainters tape and smooth it again. When you’re removing the tape it will leave a little raised edge. As you’re installing your tile, keep painters tape on the top and bottom of the channel until you are finished grouting. This will give you smooth grout lines and an easy clean up!
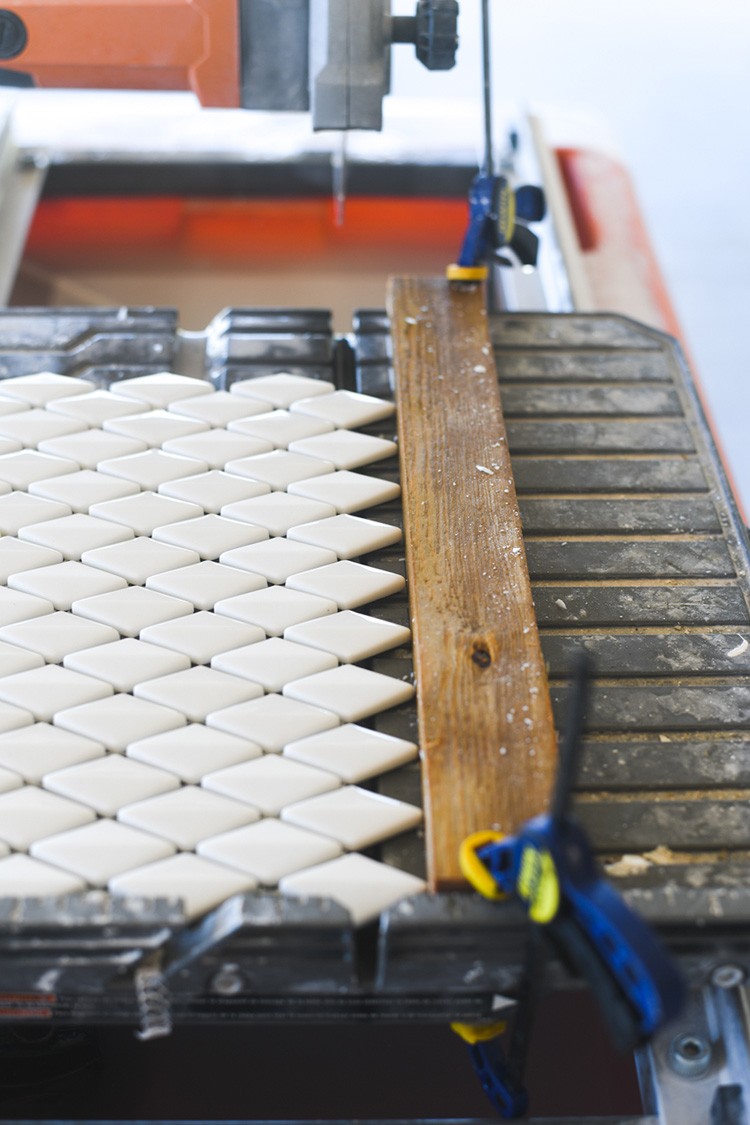 Set Up A Tile Jig
Set up a jig on your tile saw! With a few clamps and a piece of wood, I was able to quickly and precisely cut all of my accent tiles to shape. A jig will take all of the guesswork out of measurements!
You’ve totally got this!!
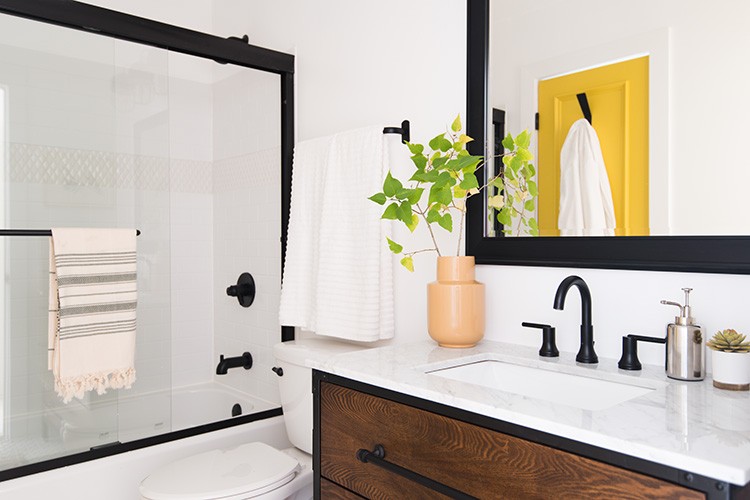
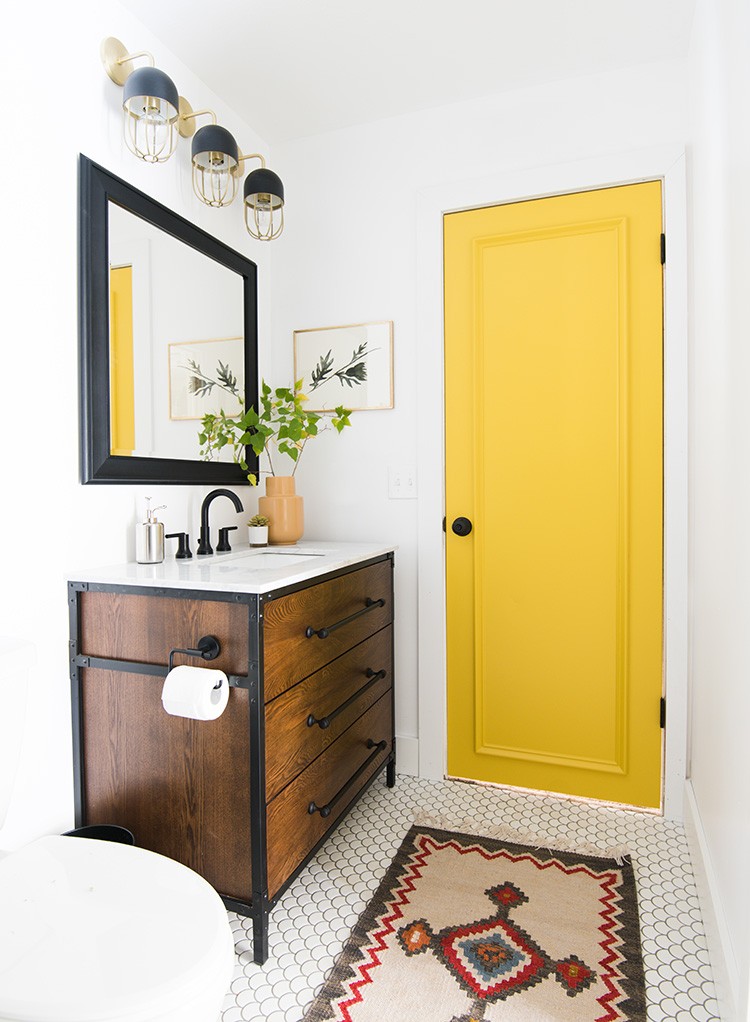
We replaced the vinyl flooring with this white scallop tile and used a medium gray grout. I love that the tile has a mixed finish, some of the tiles are glossy and some are matte. It adds a lot of dimension!
We kicked the outdated vanity and blue marble-ish countertop to the curb and replaced it with the most gorgeous vanity/counter combo of all time! The heavy oak grain on the wood coupled with the matte black metal accent gives the vanity a killer industrial/farmhouse vibe. With the lightly marbled counter/sink combo it looks like a million bucks.
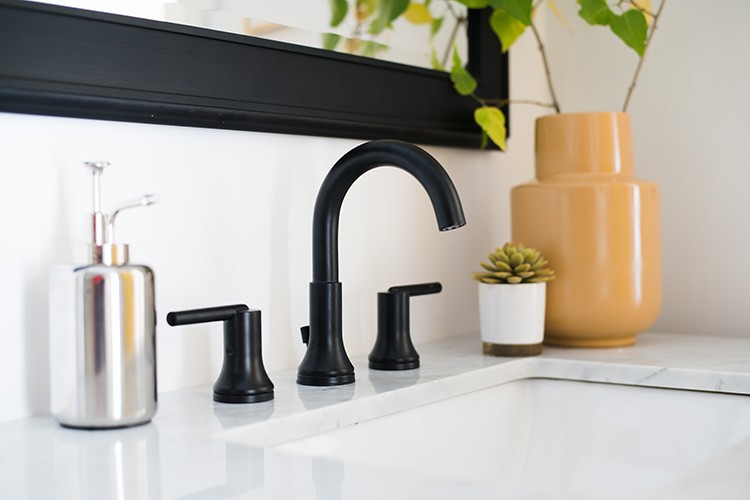 Keeping with our matte black theme, we swapped out the outdated chrome faucet with the Delta Trinsic 2 handle bathroom faucet. This is a great option even if you’re not changing out your countertop. Because the handles are separate from the spout, and each other, they will fit in almost any 3 hole installation.
 I wanted to add some serious character to the lighting and so instead of using a standard bathroom light, we used 3 sconces.
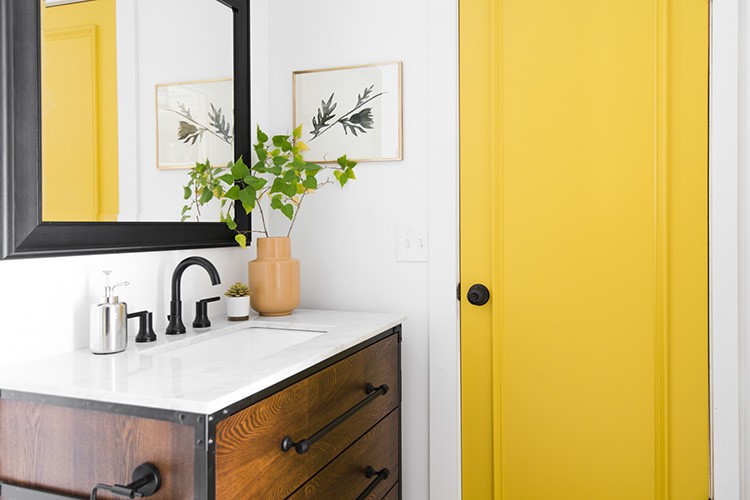
Last but not least, I made their old flat panel doors completely unrecognizable with simple in stock base moulding from Home Depot and mustard colored paint. This project took us three weekends and 18 trips to the happiest place on earth and it was worth every ounce of effort.

What was once an outdated space only a mother could love (my mother!) has transformed into a modern and approachable bathroom that anyone would be thrilled to have in their house.
And that my friends is the power of The Home Depot (and Vintage Revivals).
Head over to The Home Depot Blog for more Bathroom renovation tips and ideas.
The post Renovating a 36 Year Old Bathroom with Delta UPStile appeared first on The Home Depot Blog.
