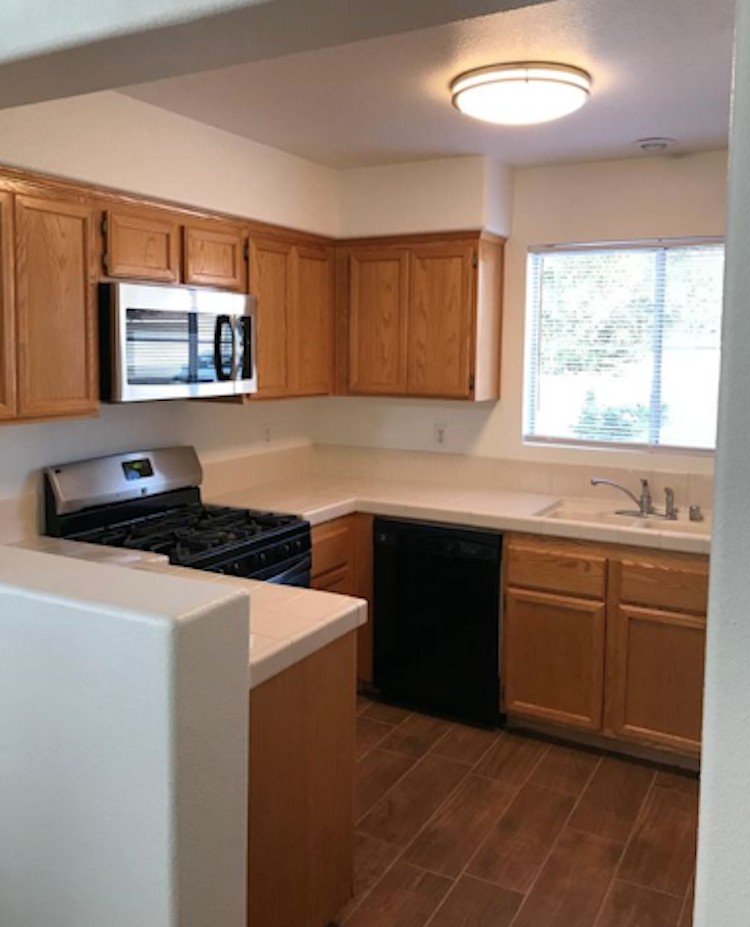
What the outdated kitchen looked like before!
I consider myself an avid DIY’er, but this is by far the biggest project I have ever tackled…and I did it by myself! We live in a 1990’s home in Las Vegas with honey oak cabinets in the kitchen and all the bathrooms. The rest of the house is updated, so the kitchen looked horrible! After a couple months of living here, I gathered some courage and decided to paint the honey oak kitchen cabinets white. The end result is incredible, and I am so happy I did it. In this blog, I am going to teach you everything you need to know about how to paint honey oak kitchen cabinets.
The Plan
I go over the inspiration for this kitchen remodel on my blog, CollectivelyCasey.com, so you can see the look I was going for. I wanted a modern yet timeless look that would compliment the rest of the house–brushed nickel accents on a bright white canvas.
Home Depot is my go-to for all DIY projects, big or small, so the first thing I did was talk to the friendly Home Depot staff about the supplies and type of paint I should use on this project, in addition to a TON of research.

Prep Work
Every blog you read about how to paint honey oak cabinets will tell you that the prep work is the longest and most important step…and I am here to reiterate that!
- Remove all cabinet doors. Use painters tape to label each door with its corresponding cabinet. Remove the hardware, hinges, and screws, leave in a baggie and store in the corresponding cabinet.
- Tape everything. Tape off any walls, appliances, counters, baseboards, and floors that you don’t want painted.
- CLEAN! Use the tsp solution and a rag to carefully clean the door fronts and cabinet frames. Our cabinets have lots of grooves, and it took some extra elbow grease to make sure every inch was clean. Don’t forget the backs of the doors!
- Start sanding. Our cabinets were recently varnished, which meant I had an additional layer of shine to sand through. For this reason, I used liquid sander in addition to a sanding block to make sure I had no shiny residue left on the cabinets.
Prime
The next step is to start priming. Use a high quality oil based primer like Zinsser to ensure an even and well coated surface. I used a high density foam roller on the frames and the fronts, and a brush to get in all the grooves. The roller leaves a bit of texture, similar to the look of spray painted cabinets. Fair warning, oil based primers STINK so make sure to prime outside and consider using a ventilator mask.
Priming Tips
- Do at least two coats of primer on all surfaces you plan to paint.
- Lightly sand in between each coat, to get rid of drips or uneven surfaces.
- I let each coat dry for 24 hours. This is longer than the recommended time on the primer can but I wanted to really let the primer set before adding more!
- Oil based primer is really difficult to wash, so just store your wet brush and roller in a gallon sized bag until you are ready to do the next coat.
Painting
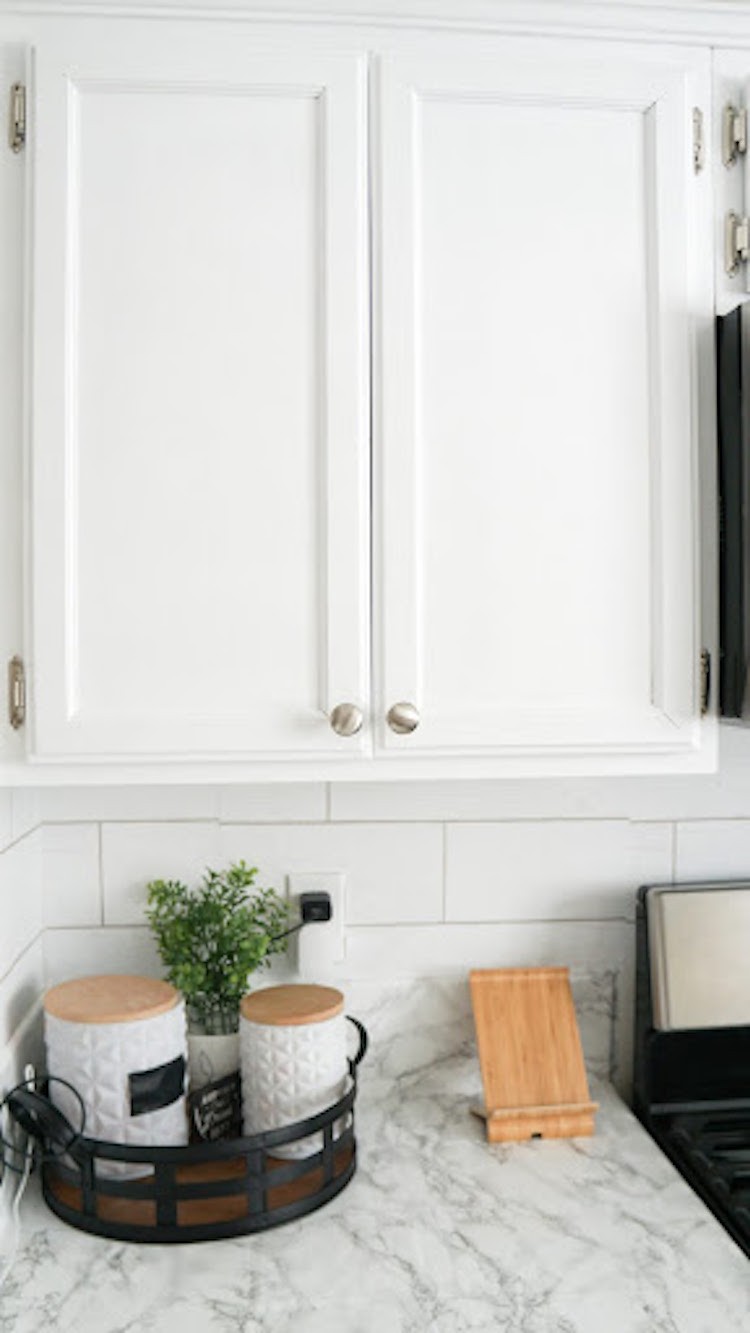
You have done all the prep work, now it’s time to learn how to paint honey oak kitchen cabinets! I decided to use Behr’s Satin Enamel in the color Aspen Snow without any tint. I love how bright and white the cabinets turned out and am glad I went with it! Once again I used a high density foam roller for the frames and fronts and a paint brush for the grooves. The paint goes on very easily, and is great at self leveling.
Painting Tips
- Use a different paint tray, foam roller, and brush than you used for priming. It’s good to start fresh!
- Lightly sand in between coats to make sure you have a smooth and even finish.
- Less is more! Apply paint in thin coats gradually rather than thick coats all at once. The end result looks better and it actually saves you time.
- Let paint dry completely before adding a new coat. Once again I chose to wait 24 hours between coats to make sure I let the paint fully set.
- If your cabinets have deep wood grain (and you don’t want to use grain filler) use the paint brush to really fill in the grooves. Since our cabinets are old, it took a lot of paint to fill the grain but it worked and looks great.
- Be extra careful with your newly painted cabinets for the first 30 days. This is how long it takes for the paint to fully cure and harden. If you see any chipping, fix it right away!
Finishing Touches
Hardware
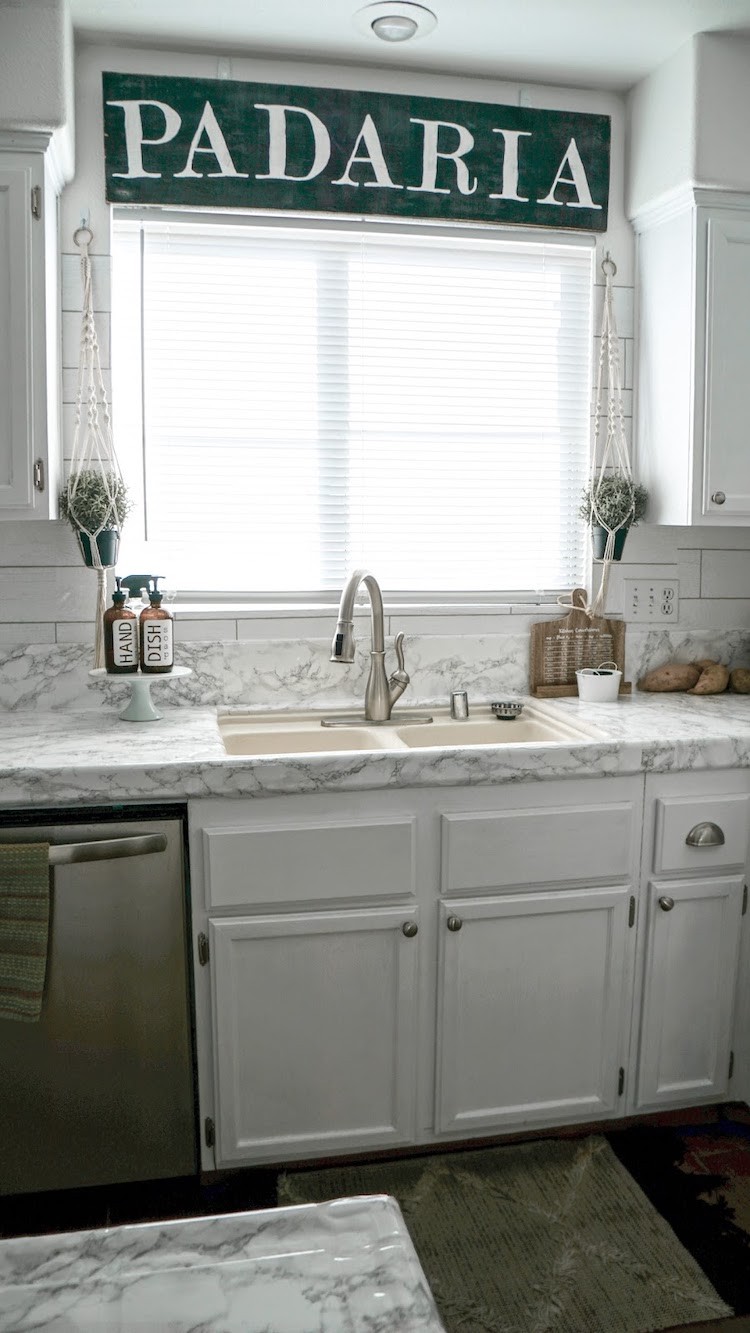
The cabinets and drawers didn’t have hardware on them when we started, so I decided to add some! I love the look of these knobs and cup pulls from the Home Depot Amerock line, and went with a brushed nickel finish to match the stainless steel appliances. The old hinges were 20+ years old and a faded bronze, so I replaced them with beautiful satin nickel. They come in bulk packages which are great for projects like this!
TIP: I tried hanging the cabinets up by myself, but the new hinges were a slightly different size than the old ones. I definitely recommend getting another set of hands to help rehang the cabinets!
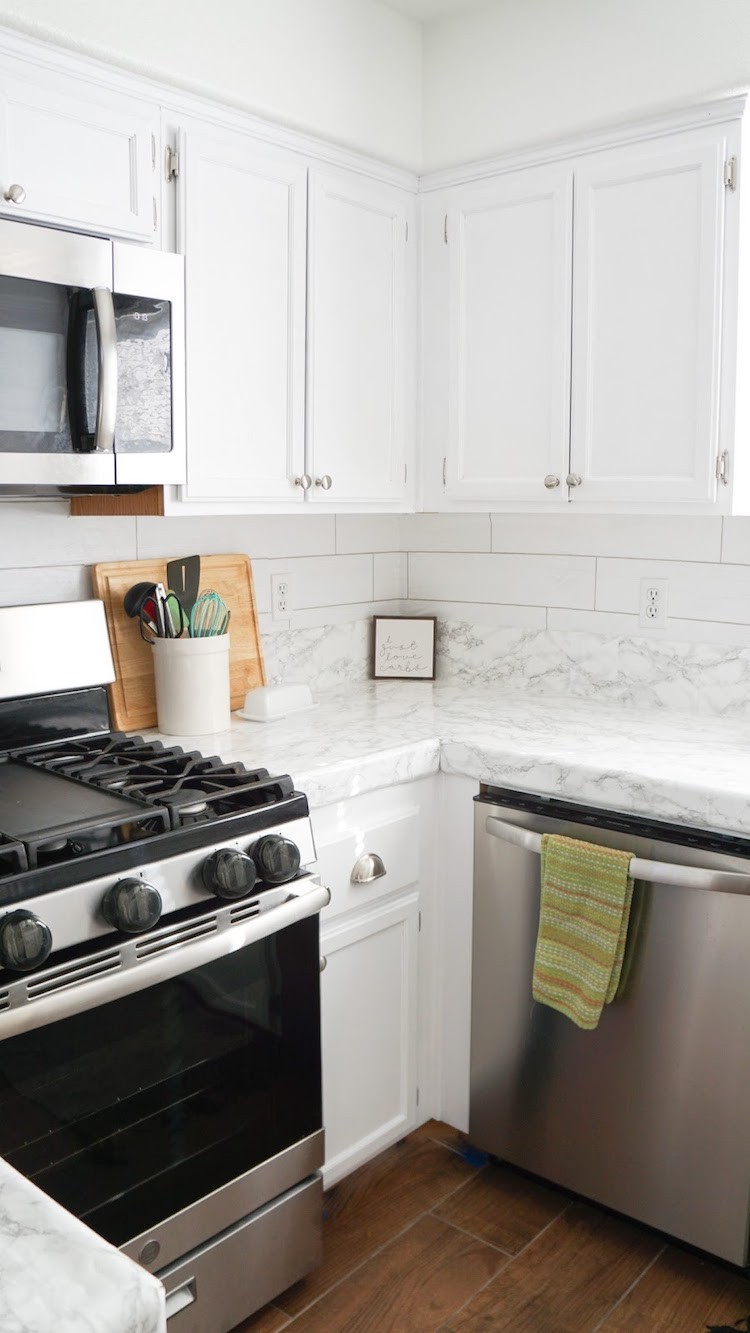
Faux Countertops
The countertops in here are an old, almond colored tile and clash with the new bright white kitchen cabinets. Demolishing tile is a HUGE project that I wasn’t comfortable tackling, so instead I turned to my favorite renter’s hack, contact paper! With 6 rolls of contact paper, I completely transformed the look of this kitchen for under $75.
TIP: This specific contact paper is thick and sticky. This is great for durability and wear but it makes it difficult to apply. I suggest having at least two people to apply it, and use a credit card to smooth out air bubbles and wrinkles as they occur.
THINGS TO KNOW: I do not place hot pans directly on the counters anymore because I’m not sure how that would affect the adhesive. The contact paper has held up extremely well even around the sink, and cleans easily with chemical free all purpose cleaner. The tile grout lines are visible under the contact paper, but they are very light. The overall aesthetic improvement far outweighs any side effects for me!
Faux Backsplash
This is a rental home and we got permission to paint from our landlords, but they didn’t want us to install anything permanent on the counters or walls. I LOVE removable wallpaper and The Home Depot has a great selection! I found this shiplap style removable wallpaper and decided to turn it into a faux backsplash. It took some effort to line up (and it isn’t perfect!) but I love what it added to the entire space! Plus it only took one roll to do our whole kitchen!
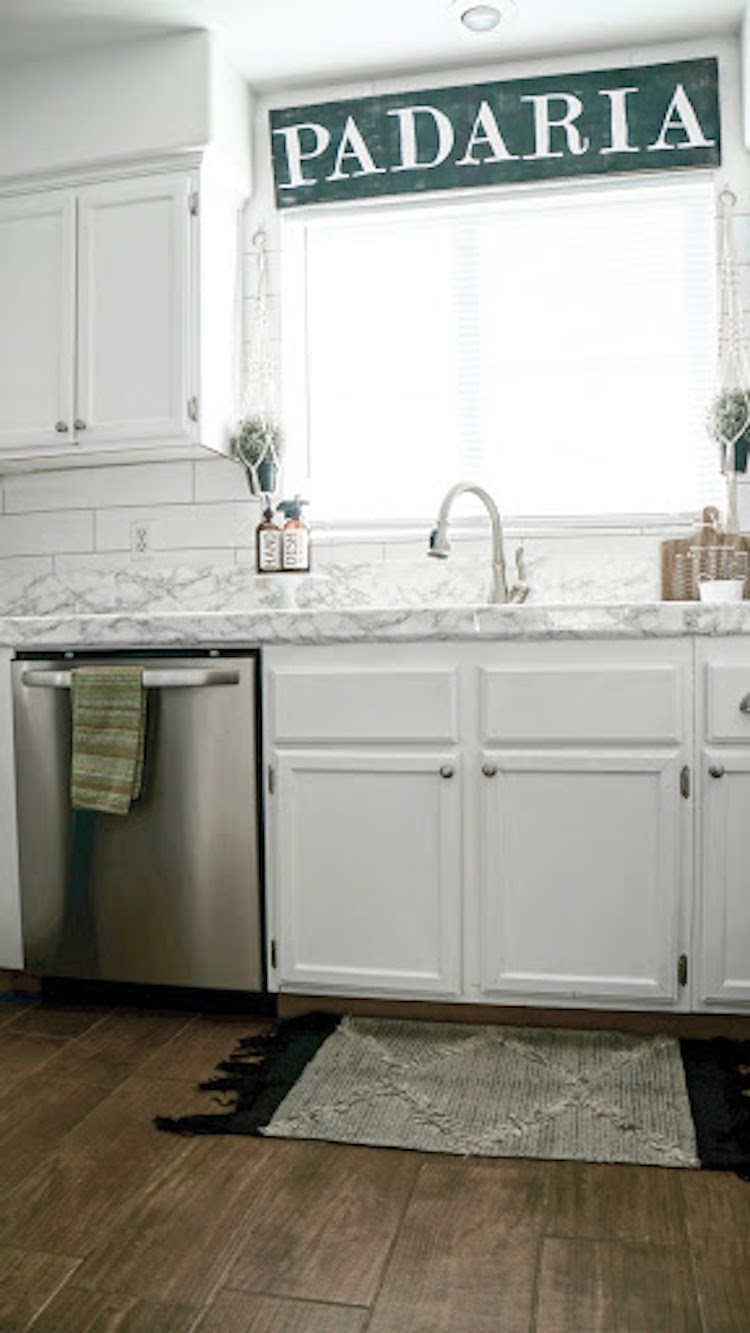
Sink Faucet
The previous sink faucet was a small, builder’s grade, shiny chrome faucet. I knew I wanted to replace it with a nice pull down faucet, and Home Depot had so many options to choose from. After reading lots of reviews, I went with the Leland Single-Handle Pull-Down Sprayer by Delta! It wasn’t too difficult to install, but I do recommend this as a two person job as well. I was surprised at how much of an impact a new faucet made on the overall kitchen! It looks so much better with the update!

Summary
I tend to be a whirlwind DIY’er, but I really took my time with this project! I stay home with my two toddlers and tackled this project alone at night, so it took me about one month from start to finish! If you wanted to, you could absolutely knock this out in a long weekend with helping hands.
I’m so happy with the end result of this project, and I can’t believe the before pictures! We lived with the old kitchen for four months and I can’t remember what it looked like unless I see an old picture. It is truly amazing what some paint, removable wallpaper, contact paper and hardware can do for a space!
The grand total of this kitchen renovation comes to $561.13. I hope this blog on how to paint honey oak kitchen cabinets is helpful to anyone wondering how to update their kitchen on a budget. If you have any questions or want to see more pictures, come say hi at CollectivelyCasey.com or on Instagram via @CaseyEAnderson. Big thank you to The Home Depot for sponsoring this project and giving us the rental kitchen of our dreams!
The post Rental Home Kitchen Renovation appeared first on The Home Depot Blog.
