
Danielle Driscoll of Finding Silver Pennies has always loved celebrating Halloween. As a part of the Halloween/Harvest Style Challenge, we sent Danielle classic Halloween décor and let her make it her own.
Read on to find out how Danielle achieved a classic Halloween look that is also family friendly.
Family-Friendly Halloween Décor
Halloween has always been my favorite holiday. When I was a little girl my mom used to make me the most elaborate costumes – a mermaid, a wicked witch with a green face mask (ouch! It tightened on my face as I trick or treated around the neighborhood), a bride, Michael Jackson. I was always so excited to get dressed up and go out that I didn’t even want to eat dinner.
Fast forward a few decades and I still feel exactly the same way about Halloween. It’s rubbed off on my boys. They love getting dressed up and decorating our home.

They played a huge role helping decorate our home in this challenge. In fact, our oldest drew the witch that we used to create the silhouette.

We live in a coastal town and everyone here is crazy for Halloween. The main street in the harbor is shut off to traffic and the merchants fling open their doors for early trick or treating. Once it gets dark, people come up our hill to continue Halloween!
For The Home Depot Halloween Style Challenge I knew I wanted to focus on classic Hallowee décor to go with our historic home. I also didn’t want to make it look too scary or gory.
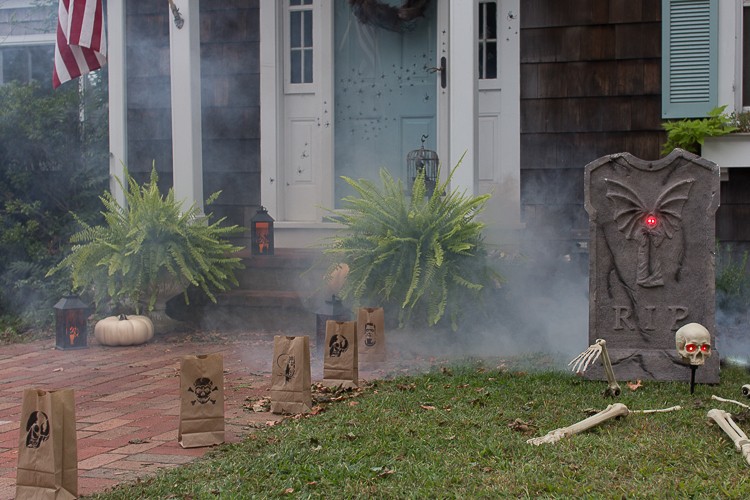
When the surprise box from The Home Depot arrived, I was so excited because it came with amazingly realistic 36 in. LED Tombstone Assortment (Set of 4), a fog machine, fog machine liquid and a fog tube accessory kit.
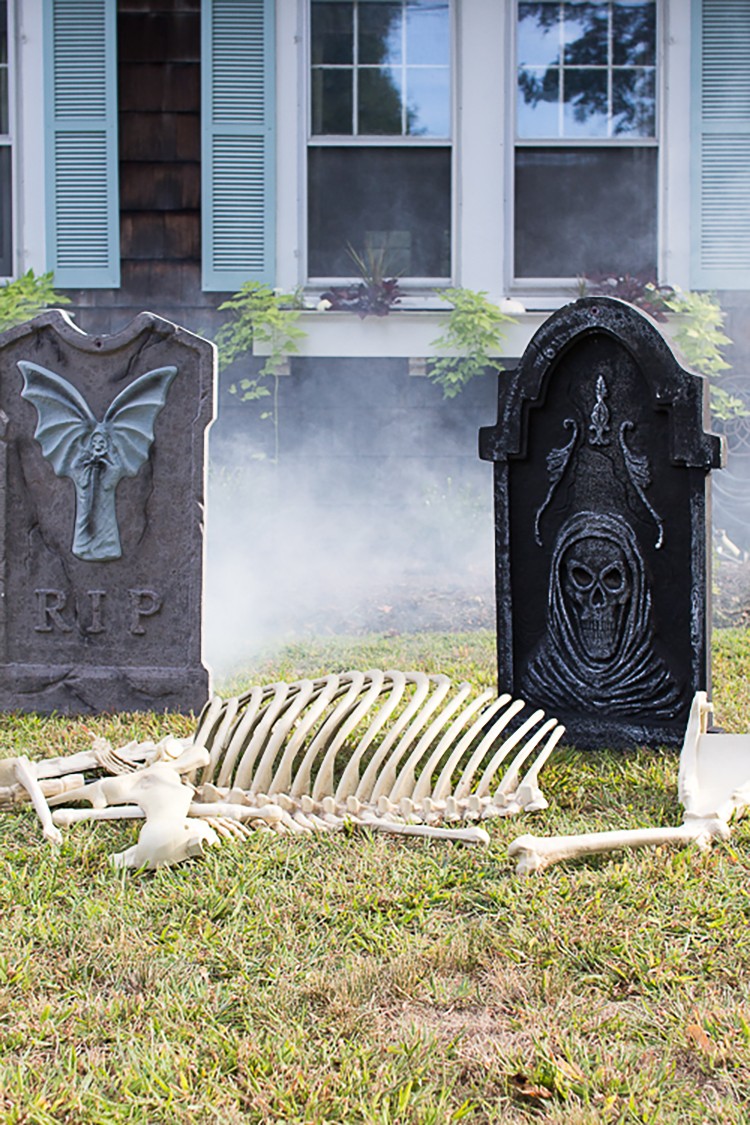
My boys were so excited about the fog machine, as was I, because it instantly adds a creepy, Halloween vibe. We had so much fun playing with it and the gravestones. The gravestones light up, which is fun at night, too.
We got busy planning out our haunted front yard.
DIY Witch Silhouette

We created a witch based on our son’s sketch. In his sketch he included a cat and a cauldron.
Materials
- ¾-in. Plywood
- Jigsaw
- Rustoleum All Surface Satin Black with Paint and Primer
Step 1
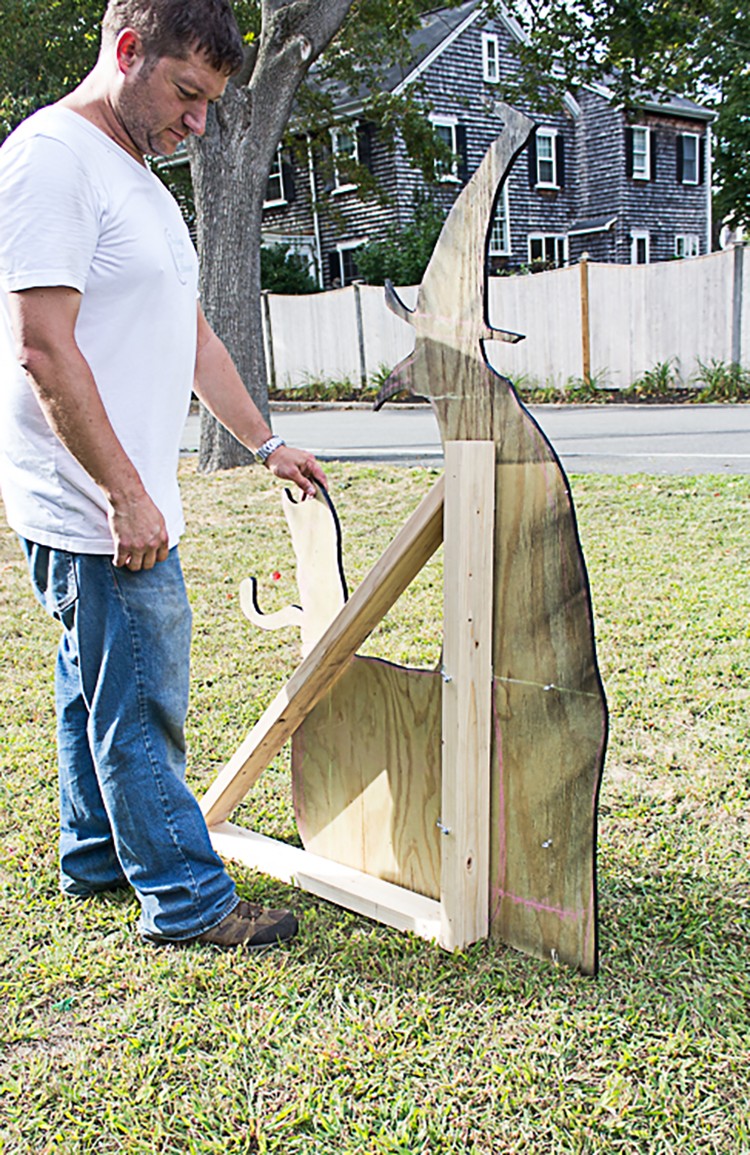
First, sketch out some ideas on paper. We all were drawing witches and cats. Then we enlarged the sketch using a photocopier. In order to scale the drawing for a large silhouette we created a grid on the drawing.
Step 2
Second, enlarge the drawing onto plywood. We used pressure treated wood because we thought it would last longer in the elements. We used ¾-in. plywood because it’s sturdier. Create a grid on the plywood to match your grid on the paper. Draw image in chalk.
Step 3
Third, go over the chalk with a sharpie pen. Once you start cutting out the silhouette the motion of the saw might shake off your chalk. Sharpie is also easier to see while you’re cutting.
Step 4
Fourth, use a jigsaw cut out the silhouette.
Step 5
Fifth, paint the silhouette with black spray paint, we used Rustoleum’s All Surface Satin Black with Paint and Primer in one. I love this spray paint because of the specialty designed nozzle – my finger doesn’t get tired and I don’t get paint all over my hands. Allow it to dry.
Step 6
Finally, build a support (see below for step-by-step instructions).

Isn’t she spooky! We love her nose!
How to Build a Support for the Witch
Step 1
First, create an L shape with two lengths of 2 x 4 connecting with a pocket hole, we used the Kreg Jig to create the pocket hole.
Step 2
Second, cut a length of 2 x 4 with 45° cuts at each end.
Step 3
Third, use pythagorus calculate to determine where the diagonal should go. Position = square root of (length of diagonal squared/2). This ensures that the L shape is square.
Step 4
Fourth, attach hinges to one side of the vertical of the L support, and then attach to the back of the witch. Ensure that the bottom of the support is square with the bottom of the witch.
Pro Tip: The best way to make sure of this is to run a square along the bottom of the witch, and up the back, then place the support along the square edge
Step 5
Finally, attach a hook to opposite side of the support. To make sure that it stays open, attach the eye to the back of the witch.
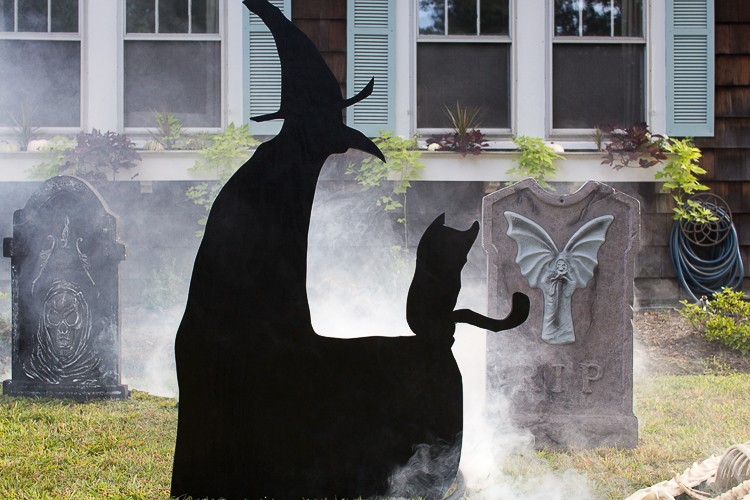
The fog machine adds to the effect as does the gravestones.
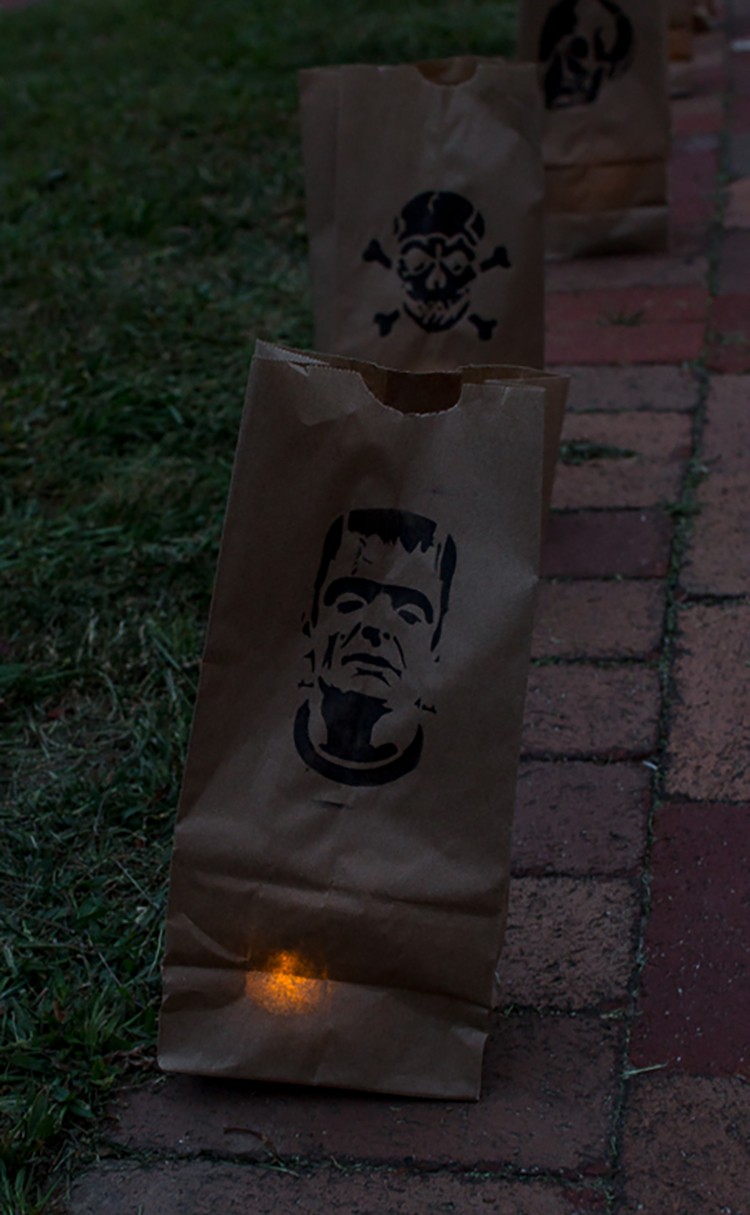
Next up we thought it would be fun to make paper lanterns to line our brick walkway to lead the way up to our front door. These were so easy to make and didn’t cost much at all.
DIY Paper Lanterns
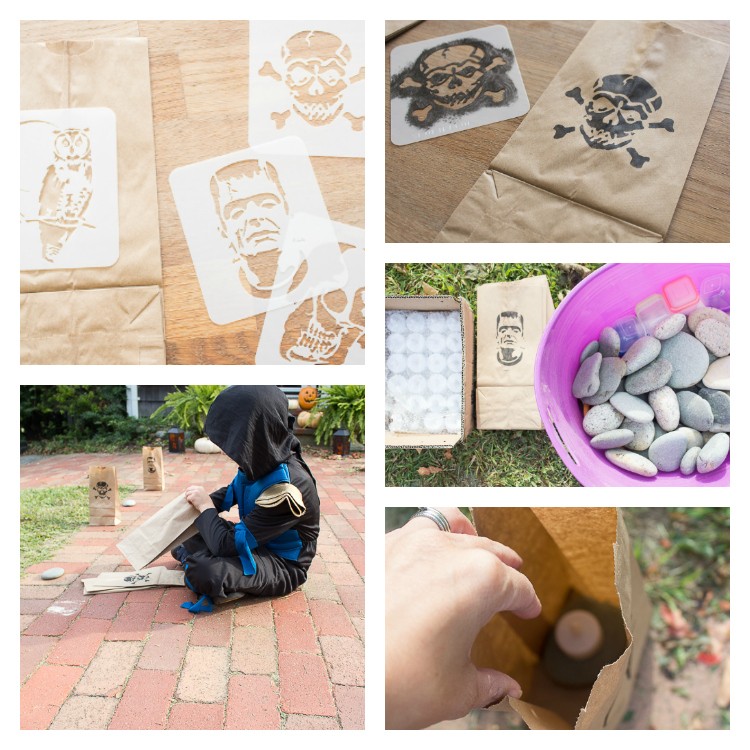
The Home Depot has really cute Halloween stencils that are miniature and great for smaller projects. They’d be cute on treat bags for a halloween party, banners, pillows or lanterns as we created. I picked up some paper lunch bags to stencil.
Step 1
First, separate your stencils. Line up stencil on a bag. You can use tape to hold it in place, but I just held it with my finger.
Step 2
Second, use black paint. I stenciled the images onto the bags using a stencil brush.
Step 3
Pro Tip: Offload most of the paint onto a paper towel from your stencil brush before stenciling. This prevents paint bleeding under the stencil and you’ll get a crisp image.
Third, weigh the bags down with rocks or stones. We used beach rocks.
Step 4
Finally, place a faux tea light in each one. This is safer than real candles and can be used multiple times.
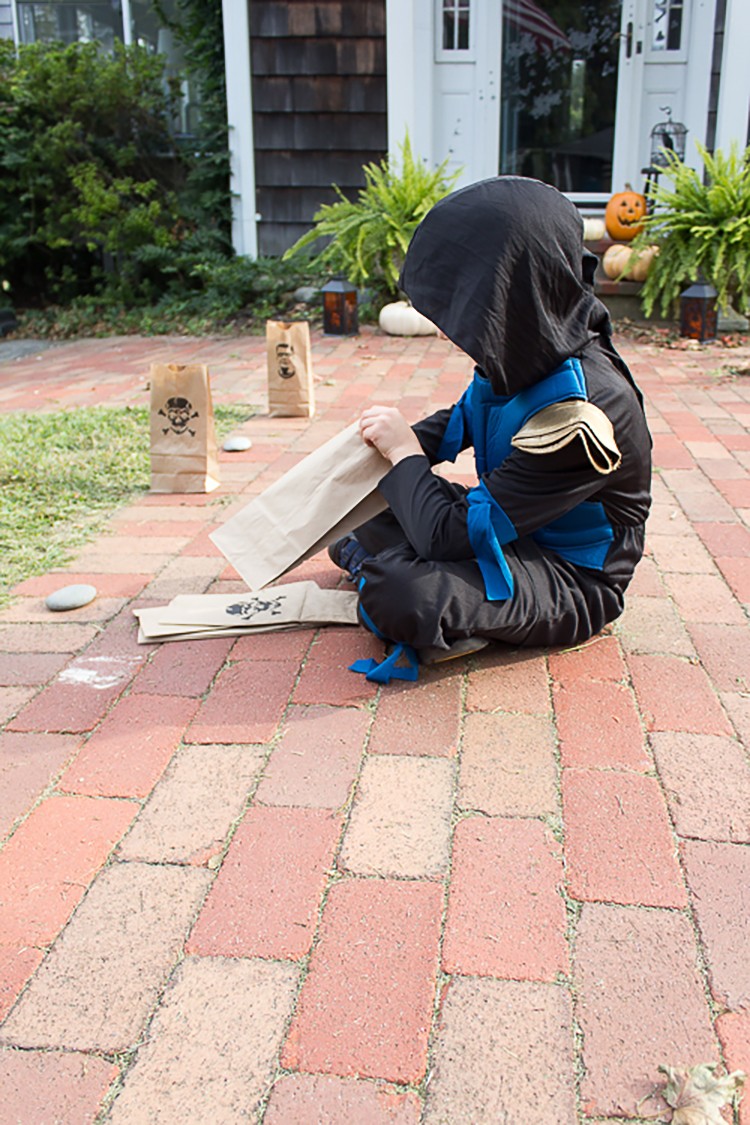
It’s more fun with a little ninja helper, too!
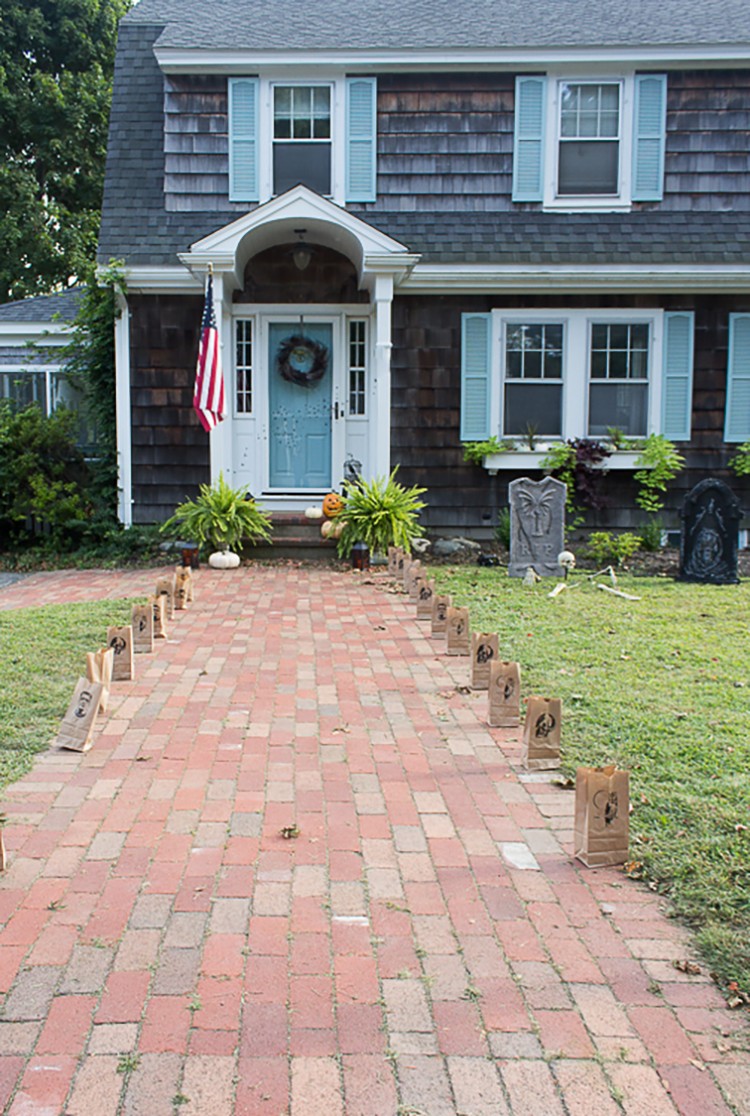
Here you can see the pretty lanterns lining our walkway to greet trick or treaters.
DIY Nature-Inspired Fall Wreath

The other DIY project we did was a wreath for the front door. I wanted to do something inspired by nature and I had a branch wreath down in the basement.
Step 1
First, use black spray paint (the same as you did for the witch) to give the natural twig wreath a spooky feel.
Step 2
Then, dismantle an ostrich duster to use the feathers for the wreath. I used one duster for this wreath. I applied the feathers using hot glue (be careful not to burn your hand).
Step 3
Finally, you can embellish your wreath. I like to keep things simple so I left it has it is, but you could stick on crows, bones, skulls or whatever you’d like to use.
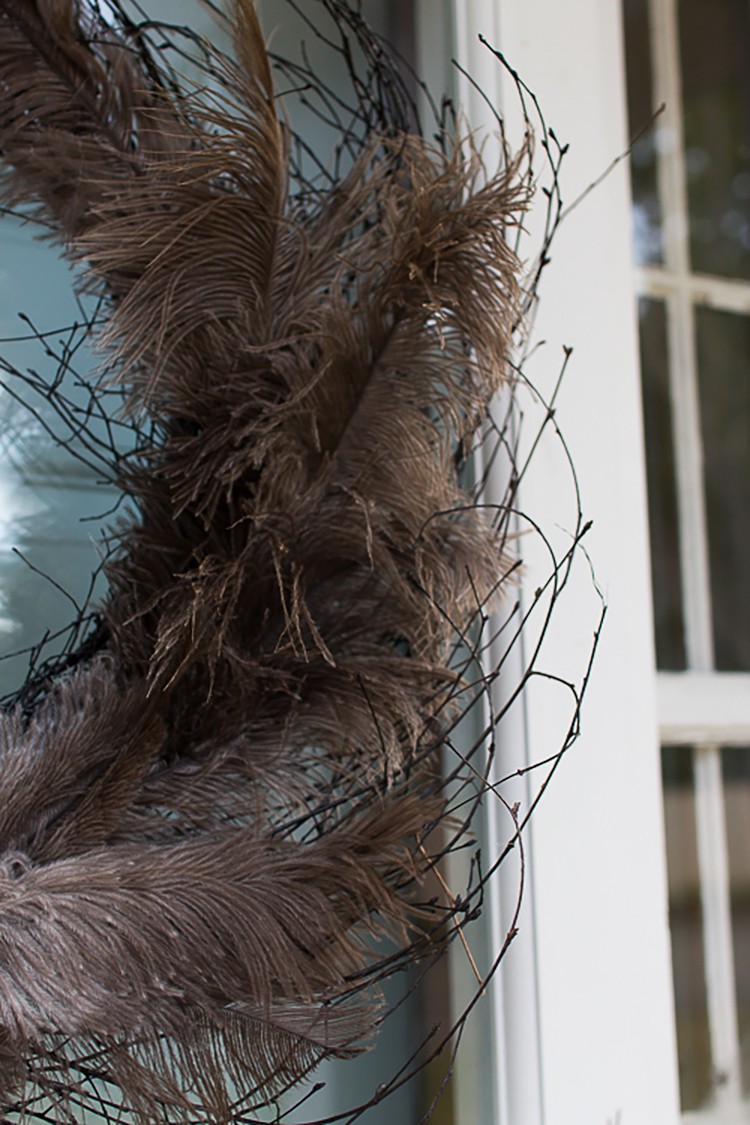
Here is a closer look at the wreath.

Here it is on the door.
Front Door Spiders
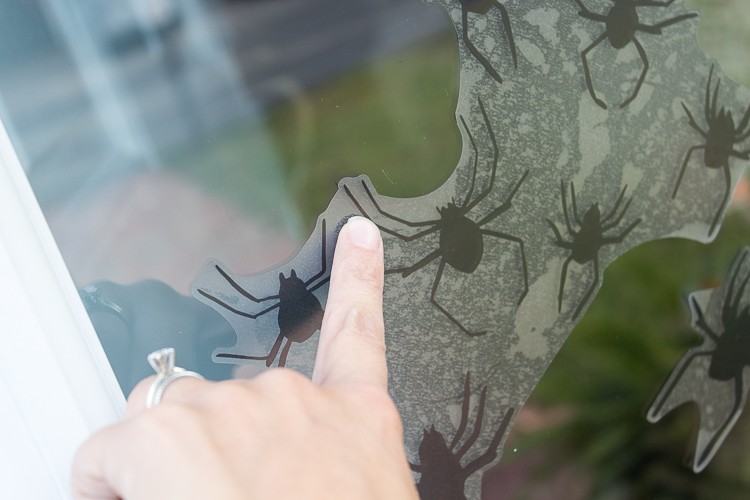
You’ll notice we added some spiders to our door. We wanted to give the appearance of spiders crawling across it.
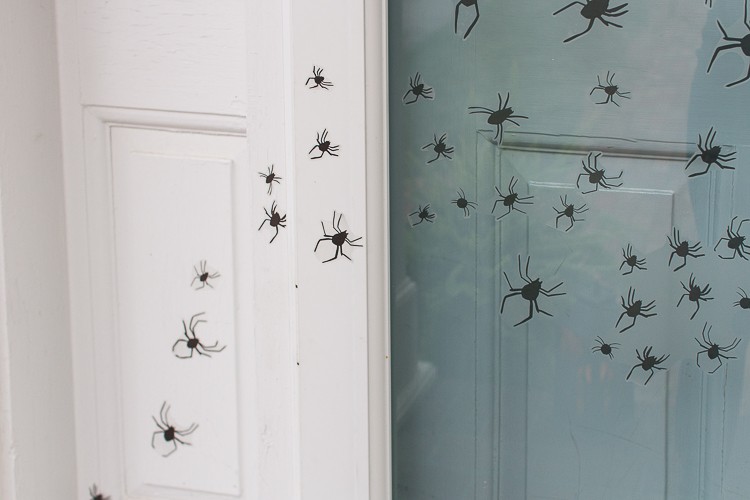

We used WallPOP’s little spiders. We stuck them to the door and painted the trim surrounding it. They were so easy to apply, remove and reposition where needed. This is a great job for little ones to help with. My little Conor (the ninja) loved helping put the spiders on.

I wish you could hear him giggling as he did it. It was so sweet.
Add More Halloween Décor
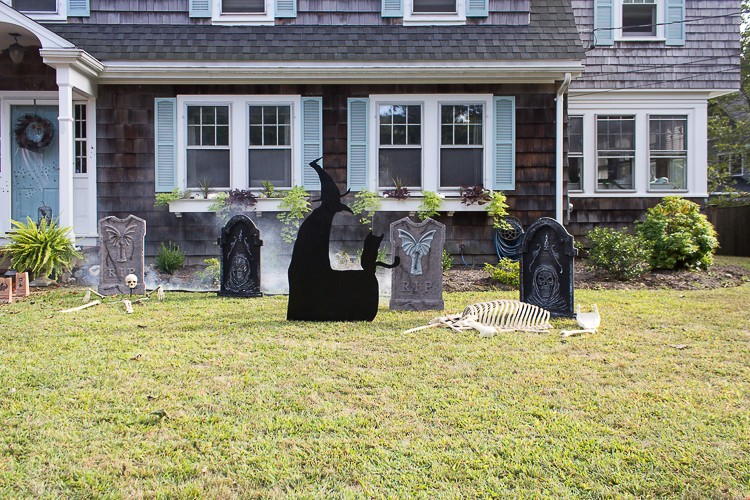
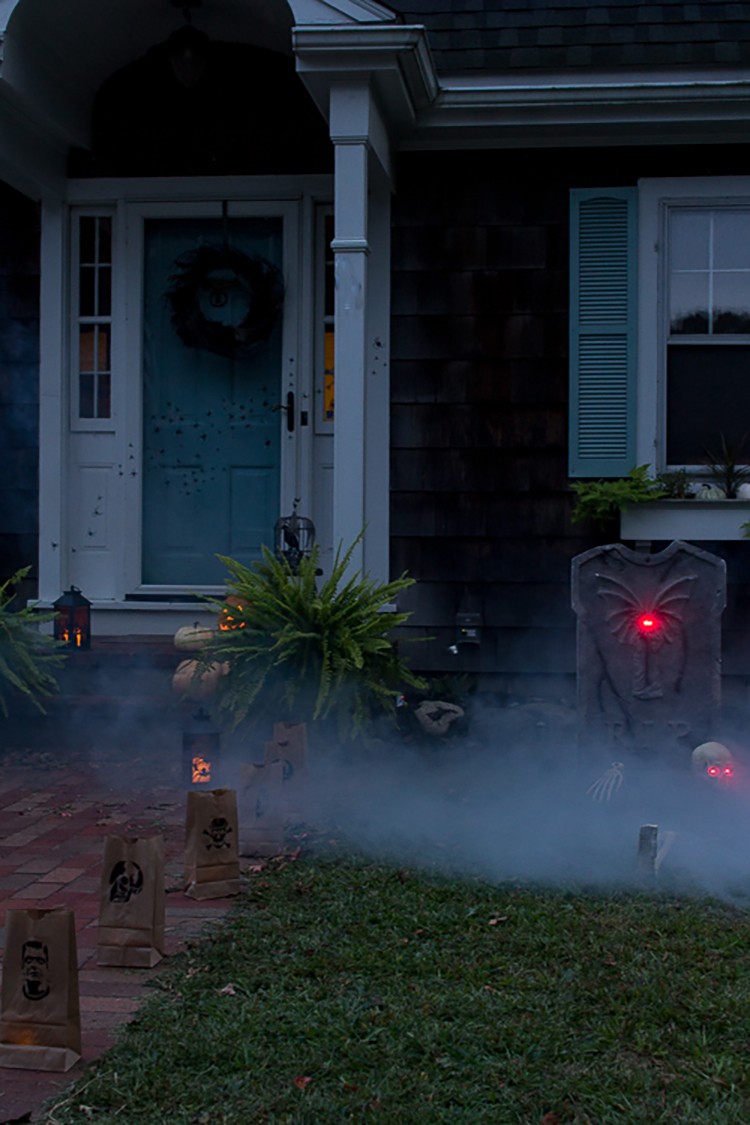
Here’s a look at our yard decorated for Halloween.

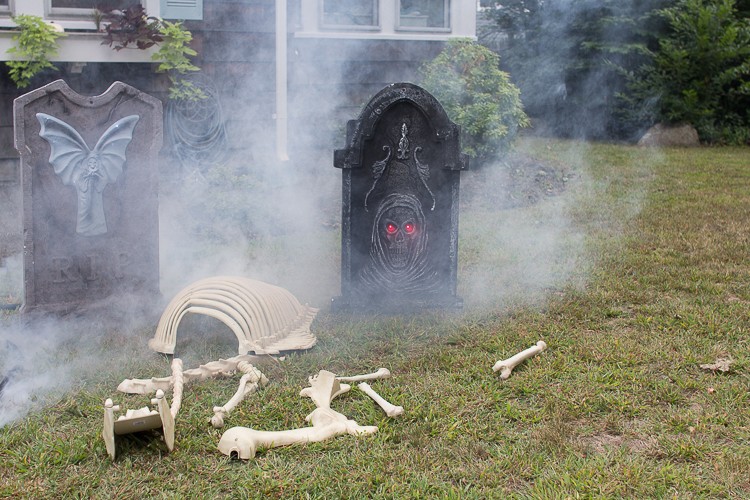
We added a bag of bones in front of the gravestones. This set was great and came with an assortment of may different kind of bones, even some dinosaur bones! The kids were excited about that. I think each set is different. This skeleton’s eyes light up and are so creepy. I’ll show you them lit up a bit later on.

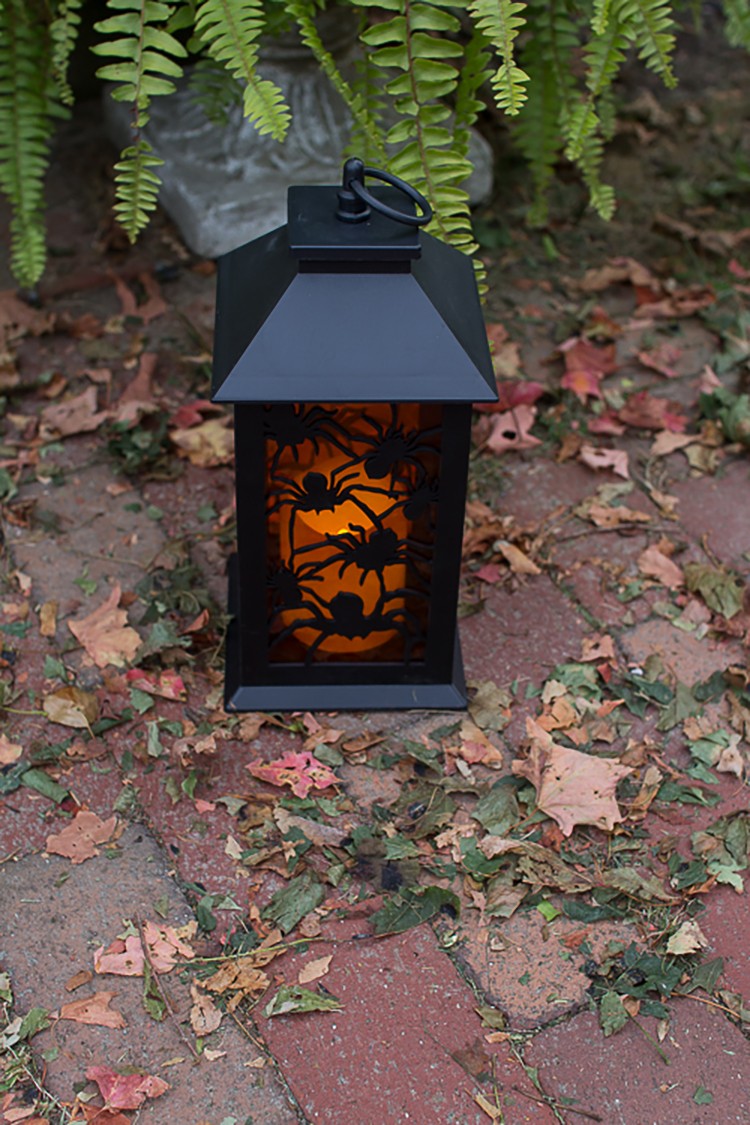
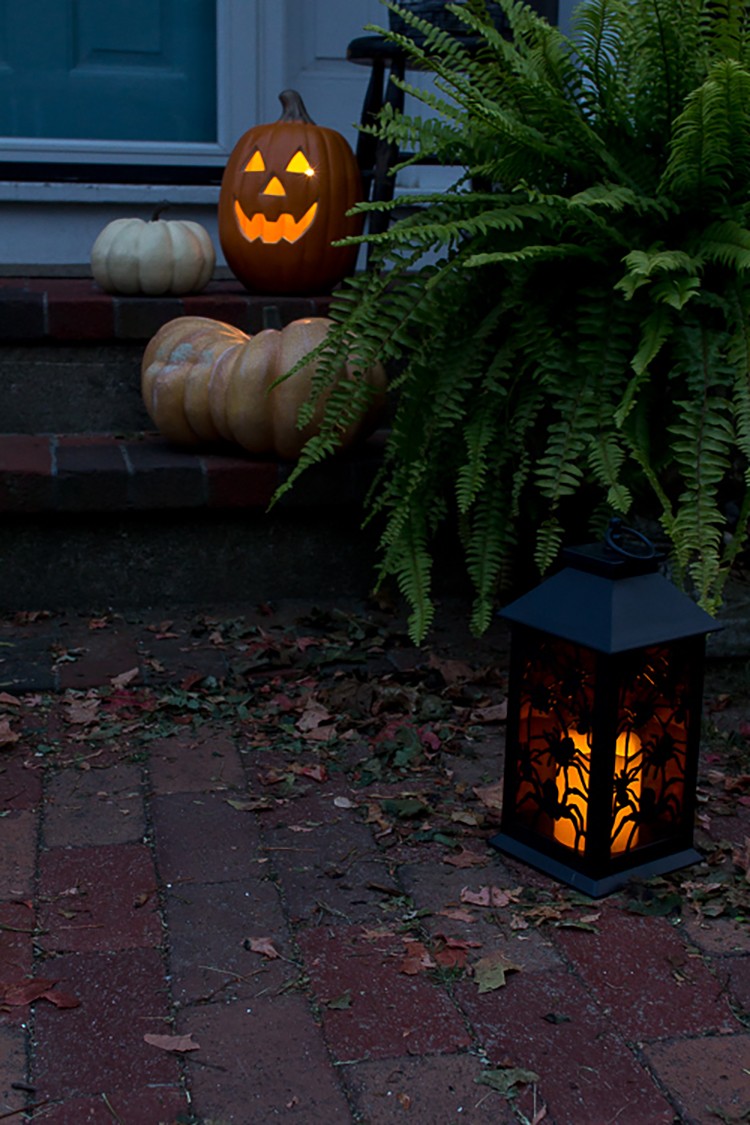
Our front steps are decorated with pumpkins and some fun lanterns from The Home Depot. These LED lanterns are battery operated. They give a spooky look once lit. They also look cute during the day. We used ones with spiders and witches to match our DIY witch.
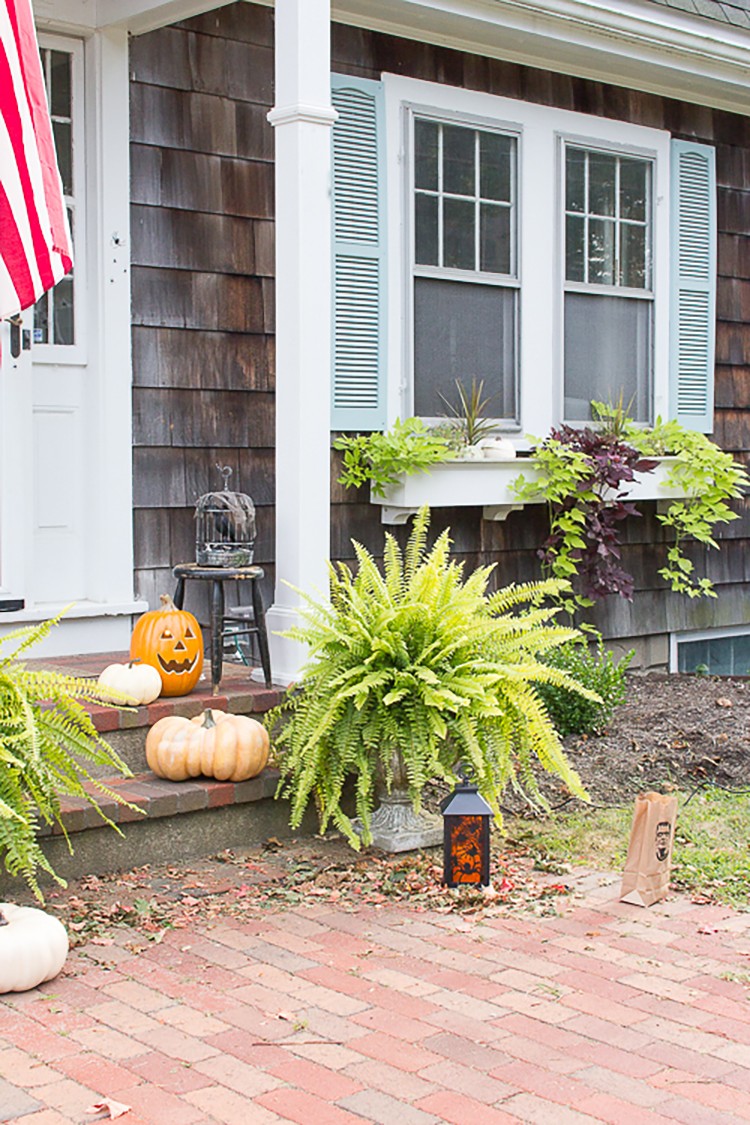
Ferns and potato vines in our planters add softness to the overall look.
Each fall we carve pumpkins, but if you’re very busy and have a lot going on, The Home Depot has a few already cut, like this one. It is easy to plug in and gave lots of light without the worry of candles.
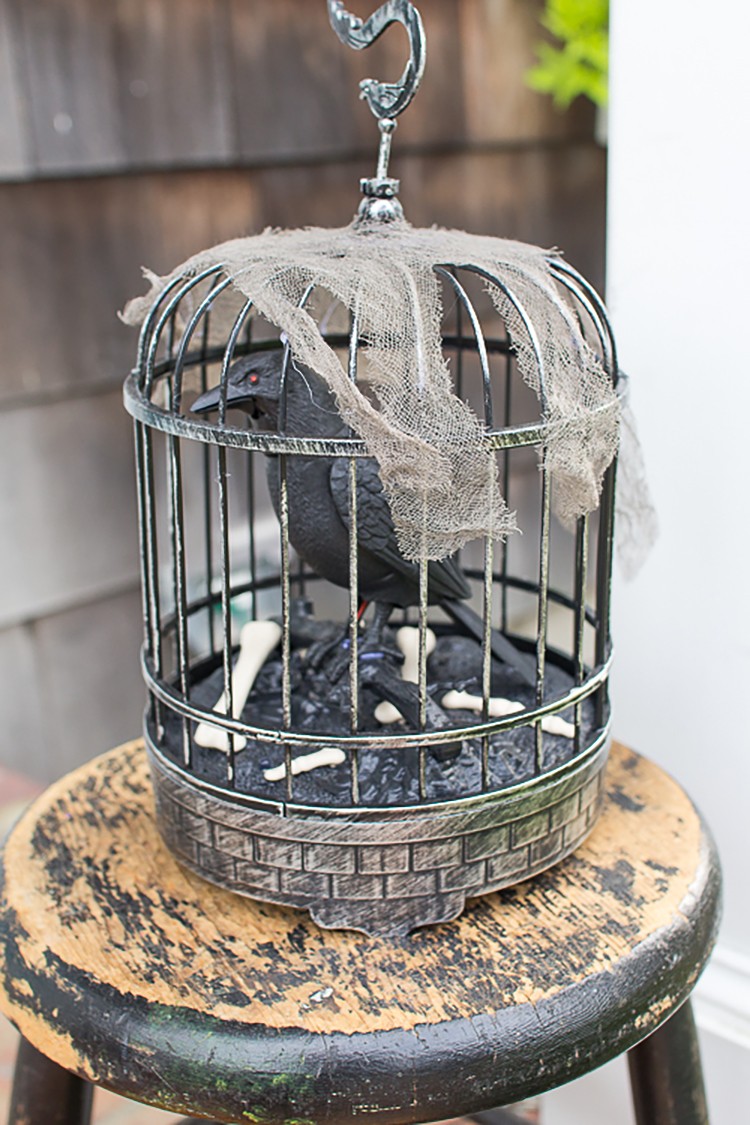
I also placed a caged raven on an old vintage stool. He talks and is so life-like.
Final Reveal

We enjoyed celebrating Halloween a tad earlier this year. It made it twice as fun!


The fog machine really adds to the ambience. I have a feeling we’re going to be using it a lot leading up to Halloween.
Here’s a look at some nighttime shots our new Halloween décor lit up.

See how eerie it looks at night with the red eyes on the skeleton and gravestone.

Add a little fog.
And DIY lanterns to light the way to lots of treats!
We can’t wait for Halloween now that all our DIY is done! I hope this gave you a few ideas of fun ways you can make your front yard more festive with your kids.
A huge thank you to The Home Depot for inviting me to take part in the Style Challenge. I had so much fun with my boys creating a spooky and classic Halloween front porch. Happy Halloween, everyone!
For more DIY Halloween and harvest ideas, see other articles in our Halloween Style Challenge series, and follow our Halloween Style Challenge board on Pinterest.
Visit The Home Depot’s online Halloween Décor Department for everything you need to decorate your home for Halloween and fall. Check out other scary skeleton decorations at The Home Depot.
The post Family-Friendly & Classic Halloween Décor appeared first on The Home Depot Blog.

