
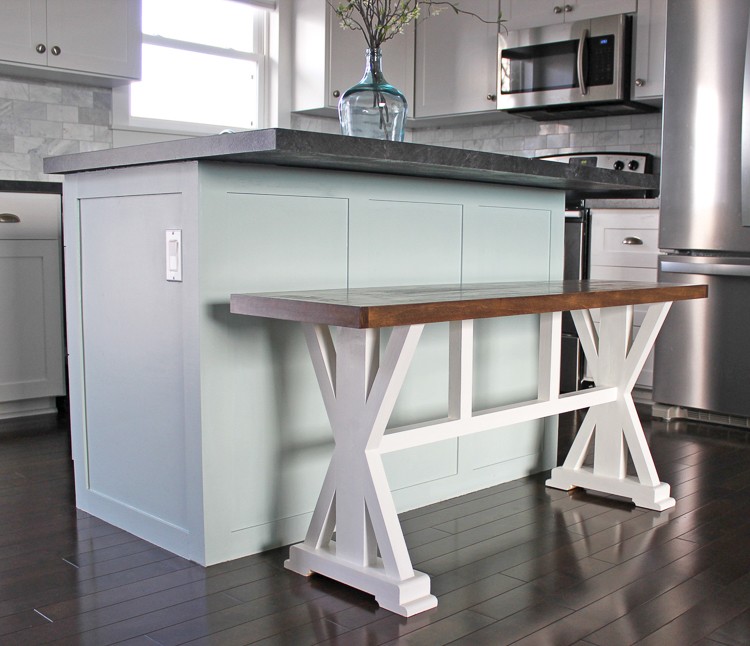
Jennifer Voelkel, of The Craft Patch, searched everywhere for a counter height bench for her kitchen. When she couldn’t find one, she did what she always does—DIY’d one!
Read on to see how Jennifer built a beautiful counter height bench and created extra seating at her kitchen island.
How to DIY a Counter Height Bench
Tools
- Miter Saw
- Table Saw
- Router, ½ in. Roundover Bit and ½ in. Cove Bit
- 3/8 in. Countersink Bit
- Kreg Jig
- Pneumatic Finish Nailer
- Drill
- Clamps
- Oscillating Tool
- Orbital Sander
- Tri-Square or Combination Square
Materials
- Wood Glue
- Kreg Screws, 1½ in.
- Wood Screws, 1½ in.
- Finish Nails, 1½ in.
- Finish Nails, 1 in.
- 3/8 Wood Dowel
- Sandpaper (60, 120, 220, 400 grit)
- Wood Filler
- Latex Paint
- Paint Brush
- Wood Conditioner
- Wood Stain (Briarsmoke and Dark Walnut)
- Wipe On Polyurethane
Lumber
- (3) Pine 1 x 4 x 8 ft.
- (2) Pine 2 x 2 x 8 ft.
- (1) Pine 1 x 2 x 8 ft.
- (1) Poplar 1 x 2 x 8 ft.
- (1) Poplar 1 x 2 x 3 ft.
- (2) Poplar 1 x 4 x 8 ft.
Step 1: Selecting the Wood for Your Counter Height Bench
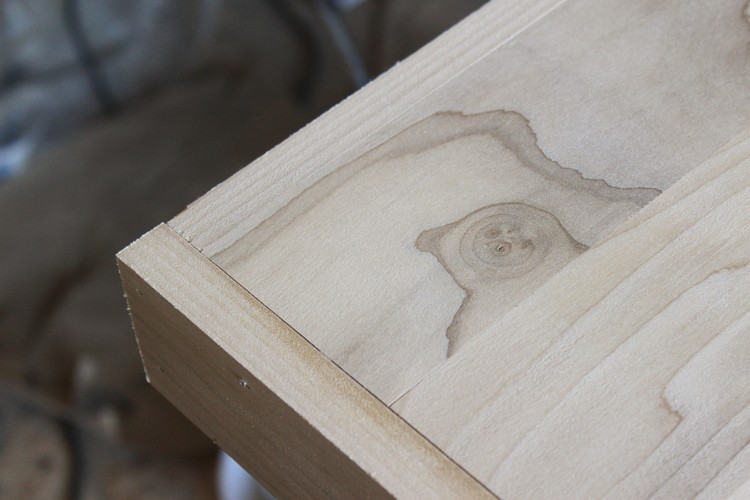
Selecting the wood you will use depends on the final appearance of the counter height bench. We wanted nice clean lines, but also understood that the base of the bench would be painted. We chose two different types of wood, one type for the base and another for the seat. For the base, we chose select pine boards. This gave us the nice crisp look that was affordable. For the top, we chose some beautiful poplar boards, but you can choose anything you want based upon the look you desire and your own price point.
Step 2: Cutting
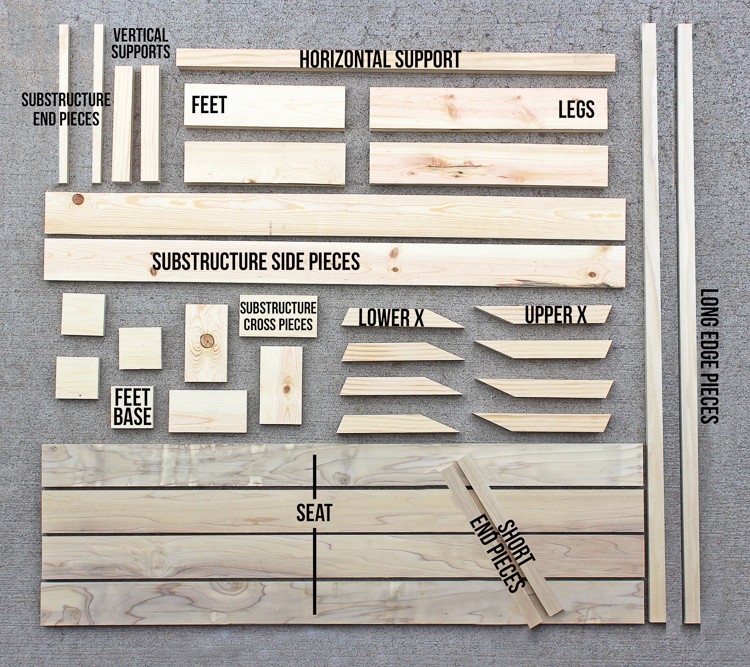
We found it most efficient to cut the individual pieces as follows.
Pine Cuts
1 x 4 x 8 ft. boards
- (4) 13 in. pieces and four 6½ in. pieces
- (4) 20 in. pieces and four 3½ in. pieces
- (2) 46½ in. pieces
1 x 2 x 8 ft. boards
- (2) 13½ in. pieces (these will need to be ripped down to a 1 x 1 nominal size (¾ x ¾ actual))
2 x 2 x 8 ft. boards
- (1) 33 in. piece, four 10½ in. pieces, and two 9¾ in. pieces
- (4) 11½ in. pieces
Poplar Cuts
1 x 2 x 8 ft. boards
- (2) 46½ in. pieces
1 x 2 x 3 ft. boards
- (2) 15 in. pieces
Parts
You will notice that 2 x 4s are listed below in the parts list, but not above in the cut list. The reason for this is that we created our own 2 x 4s. We did this because the corners on 2 x 4s are not square but are usually rounded to some degree. Others have overcome this by trimming the edges off, but for us this would have altered many of the other measurements. So rather than adjust all the measurements we glued and clamped two 1 x 4s together to achieve the desired dimensions while maintaining crisp corners. The result is that below in the parts list you will see 2 x 4s listed instead of the more numerous 1 x 4s from above.
Pine Parts
- (2) 2 x 4 – 13 in. feet
- (2) 2 x 4 – 20 in. legs
- (4) 1 x 4 – 3½ in. feet base
- (4) 1 x 4 – 6½ in. substructure cross piece
- (2) 1 x 4 – 46½ in. substructure side piece
- (1) 2 x 2 – 33 in. horizontal support
- (4) 2 x 2 – 10½ in. lower X
- (4) 2 x 2 – 11½ in. upper X
- (2) 2 x 2 – 9¾ in. vertical support
- (2) 1 x 1 – 13½ in. substructure end piece
Poplar Parts
- (2) 1 x 2 – 15 in. short end pieces
- (2) 1 x 2 – 46½ in. long edge pieces
- (4) 1 x 4 – 46½ in. seat
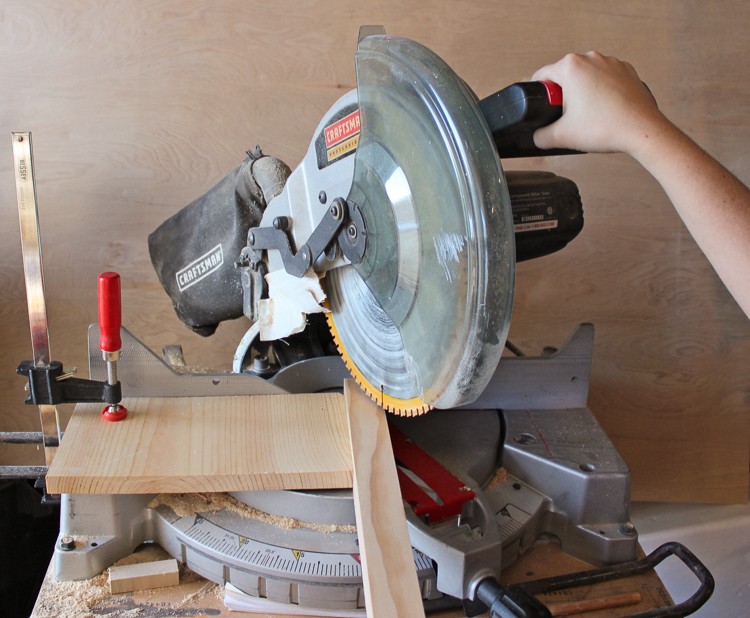
With the exception of the upper and lower X pieces, all of the pieces should be cut square. For the upper and lower X pieces, the cuts will be the same but the lengths will be different. The cut on one end of the X will be 24° and you will have to adjust your miter saw to that angle. The cut on the other end is the 90° reciprocal making it a 66° cut.
Typically, a miter saw can be positioned up to a 45° angle, but not as far as the 66° needed. The solution is simple, however. Rotate your X piece 90°. This puts the short side against the miter fence. Having this short edge against the fence creates instability in the work piece, but again there is a solution. Clamp a piece of scrap wood with square edges to the miter table and use it as a temporary fence to hold the X piece for the 66° cut. As is true any time you’re working with power tools, be very mindful of the position of the saw blade and your fingers.
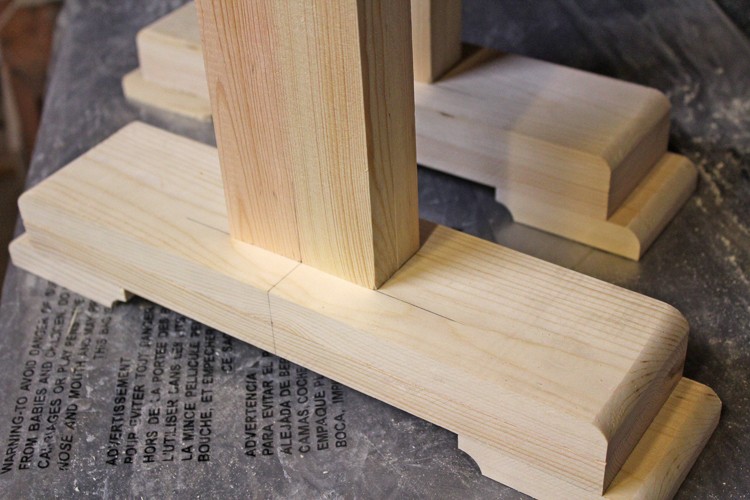
Step 3: Counter Height Bench Feet

Starting from the bottom up, we began with the feet. The base of the feet is routed using a ½ in. round-over bit and a ½ in. cove bit as shown.
Next the 2 x 4 piece of each foot will need the top corners routed using the ½ in. round-over bit.

The final step for the feet is to glue and nail the base of the feet to the 2 x 4. This is easiest if the pieces are glued and clamped in place before nailing. A pneumatic finish nailer with 1½ in. nails makes the job a snap. The foot base piece extends ¾ in. beyond the end of the 2 x 4 foot.
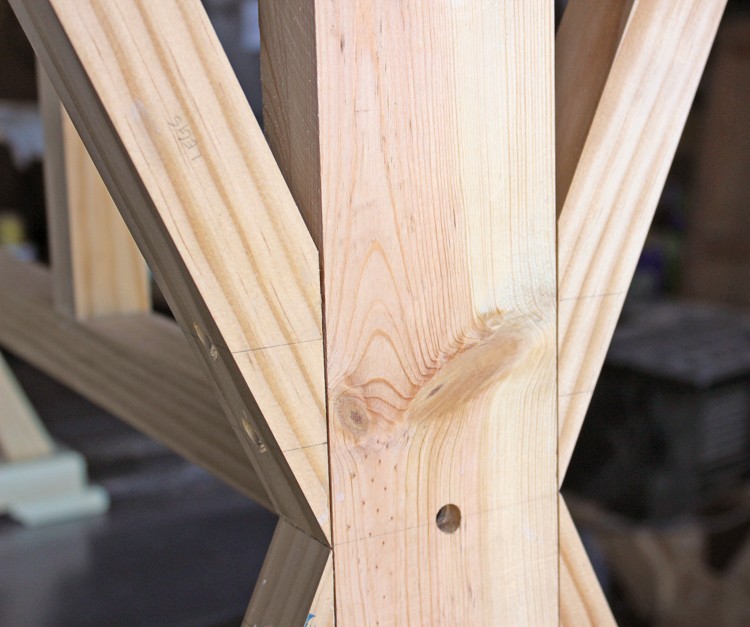
Step 4: Bench Legs
The legs all need to be screwed together rather than nailed. The first step is to center the legs on the feet. Then beginning on the bottom side of the feet and using a countersink bit, drill two holes into the foot to attach the 2 x 4 leg and one hole for each X part of the lower leg.
Using the layout lines on the top of the feet, glue and screw the 2 x 4 leg to the foot.

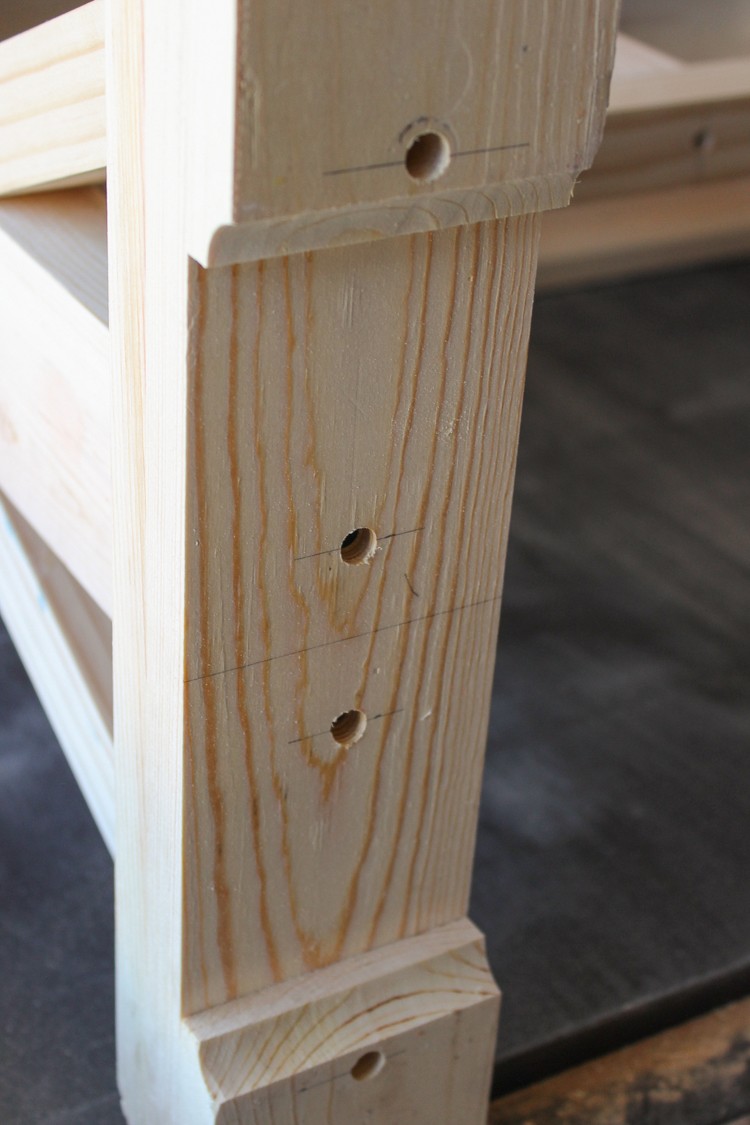
Next two counter sink holes will need to be drilled into both the upper and lower X part the leg as shown. Prior to drilling the holes, use a square to draw reference lines on to the leg. These lines will allow you to drill the countersink holes at the proper angle.
Once the 2 x 4 leg is attached, glue and screw the lower X part of the legs in place. Lastly, to ensure that the upper X part of the legs is properly situated, using a flat surface turn the leg upside down with the foot in the air. If your measurement and cuts are correct the upper part of the X should sit flush on the flat surface and should just meet the lower part of the X where they attach to the 2 x 4 leg. Apply glue and screw the upper X into place.
Step 5: Substructure

Lay out the substructure pieces as shown above.
Begin drilling holes using your Kreg jig. Each cross piece will need two holes on each end. After the holes are drilled, use clamps, glue, and Kreg screws along with the accompanying Kreg bit to assemble the substructure of your counter height bench. Lastly glue and nail the 1 x 1 end pieces into place.
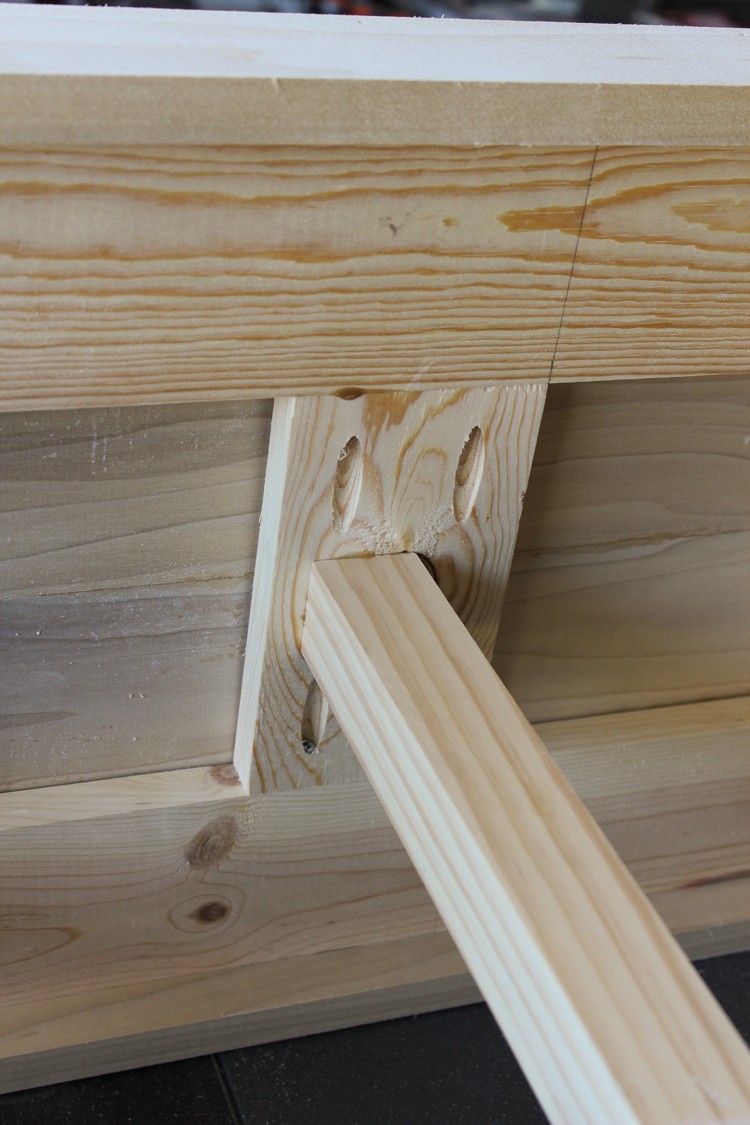
Step 6: Center Supports Installation and Assembly
The 2 x 2 horizontal support will be centered front to back in the middle of the 2 x 4 leg and aligned vertically in the middle of the X. A single countersink hole needs to be drilled beginning on the outside of the leg.
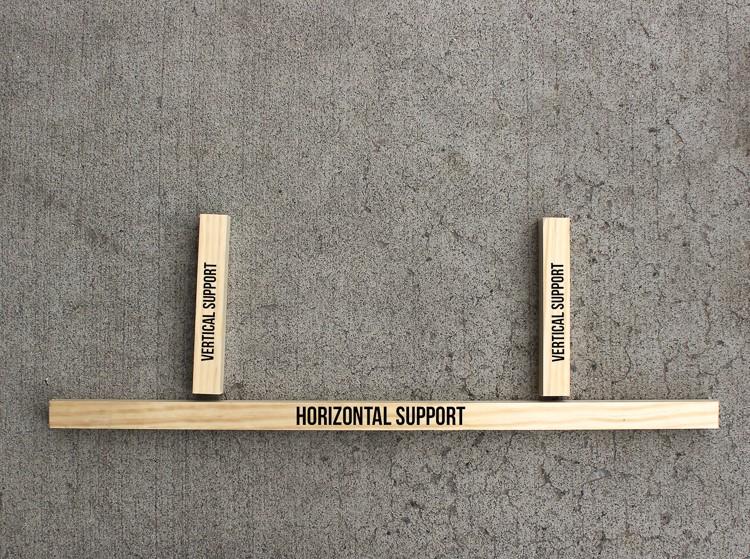
The two countersink holes need to be drilled 10¾ in. from each end in the horizontal cross piece. These will be the attachment point for the two vertical support pieces.
Glue, clamp and screw the two vertical support pieces to the horizontal cross piece.
Glue and screw the horizontal cross piece to each leg.

Using the countersink bit, drill holes in the cross pieces of the substructure that correspond with the top of the 2 x 4 leg, the upper X part of the leg, and the vertical support pieces. Glue and screw the substructure to the legs and vertical support pieces.
Step 7: Filling Countersink Holes
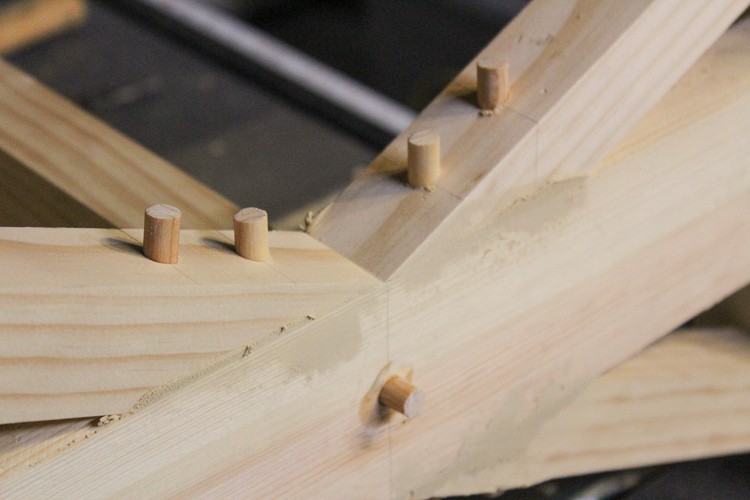
Often countersink holes are filled using pre-made buttons or plugs. Because the holes on the X part of the legs are an unusual angle, using pre-made plugs will not work. Instead, we glued a 3/8 in. dowel cut into short pieces into the holes.
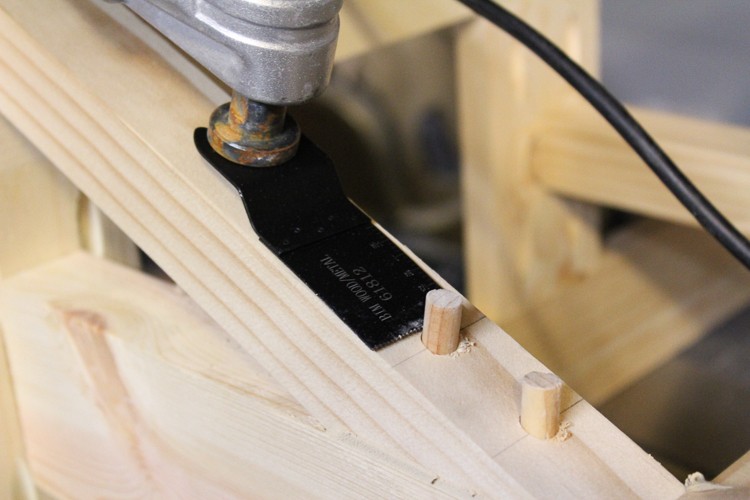
Once the glue is dry, cut them flush using an oscillating tool or saw.

Sand the dowels smooth.
Sand the entire bench base before continuing.
Step 8: Seat
Begin by edge gluing and clamping the 1 x 4 seat pieces together. Let dry overnight. The seat will be 14 in. wide and need to be ripped down to 13 ½ in. wide. Using a table saw remove ¼ in. from each long edge. Glue and nail the two long 1 x 2 edge pieces to the seat. Finally, glue and nail the two short end pieces to the seat.
Slip the completed seat over the substructure and using 1 inch nails, secure into place.
Using wood putty fill in exposed nail holes in the seat.
Finish sand by using a large 60-grit sandpaper followed by medium 120-grit and 220-grit sandpapers. Finish the preparation for stain on the bench seat by using a 400-grit sandpaper.
Paint the bench base using satin latex paint.
Stain the bench seat and coat with polyurethane.
The post How to Build a DIY Counter Height Bench appeared first on The Home Depot Blog.

