
If your home doesn’t have a fireplace, build a DIY faux fireplace!
Ashley Basnight, who writes Handmade Haven, built her own faux fireplace. Not only is it cute and on-trend with its sliplap sides and limewashed faux brick, Ashley also included some extra storage space!
Here’s her step-by-step tutorial.
Build a DIY Faux Fireplace for Your Home

Who doesn’t love a cozy fireplace? When I bought my house I was super bummed that it didn’t have one, so I have been planning to build a faux fireplace since, and I finally got my chance.
Here’s how I did it.

Materials
- DAP Plastic Wood-X with DryDex Dry Time Indicator
- DAP “ALEX FAST DRY” Caulk / Caulk Gun
- Behr Marquee Paint “Ultra Pure White”
- HDX Paint Mixing Cup
- Bristle Brushes/ Foam Brushes
- Rust-Oleum Chalked Ultra Matte Paint in Aged Gray and Linen White
- Sheet of Brick Panel
- Kreg Pocket Hole Screws
- Soft Close Ball- Bearing Drawer Slides
- Gorilla Glue
Tools
- Flexio 590 Spray Paint Gun
- Ryobi Corner Cat Sander
- Ryobi Brushless Hammer Drill
- Ryobi Nail Gun/Staple Gun
- Kreg Jig Pocket Hole Machine
- Kreg Drawer Slide Jig
- Dewalt Table Saw
Cut List
4×8 – ¾” MDF
- Hearth Drawer Front 54” x 10 5/8
- Hearth Backing 52” x 10 1/2”
- Hearth Bottom Piece 52” x 21”
- 3 Hearth Side and 10 ½” x 20 ¼”
- Hearth Middle Piece 10 ½” x 20 ¼”
- 4 Drawer Sides 19 ½” x 9”
2×4 – ¾” MDF
- 4 Drawer Faces 22 3/8” x 9 1/16”
4 x8 ¼” MDF
- 2 Drawer Bottoms 19 ½” x 23 7/8”
- Fireplace Backing 43 11/6” x 51 ½”
8ft Routed 1×12 MDF Board
- Hearth Front Top 11 ¼” x 55”
4×8 – ½” MDF
- Hearth Back Top 12” x 55”
- Fireplace Top 15” X 57 ½”
- Top Frame Covering 16” x 53 5/8”
- 2 Frontside Covering 13 ¾” x 27”
- 26 Shiplap Trimming 2 ½” x 8 11/16”
- 2 Shiplap Trimming 1 ½” x 8 11/16”
2×4 – ½” MDF
- 2 Side Frame Covering 13 ¼” x 43”
5 – 2x4s @ 10ft
- 2 Top Frame Pieces 51”
- 4 Side Frame Pieces 40”
- 4 Inner Frame Pieces 26”
- 4 Bottom Frame Pieces 12”
- 4 Frame Connectors 12”
- 2 Middle Frame Pieces 48”
(Select Pine) 5 – 1x3s @ 8ft
- 4 Horizontal Side Trim 13¼”
- 4 Vertical Side Trim 38”
- 2 Front Vertical Trim 42-16/18”
- 2 Middle Vertical Trim 37-3/8”
- 2 Horizontal Trim 9”
- 1 Middle Trim 26-1/8”
(Select Pine) 1 – 1×6 @ 6ft
- 1 Horizontal Trim 48½”
Select Pine – 1x2s @ 8ft
- 1 Front Trim 54-3/8”
- 2 Side Trim 13¼”
1 Sheet Brick Panel
- Back Brick Panel 30” x 32”
- 2 Side Brick Panels 13” x 27¼”
Step 1
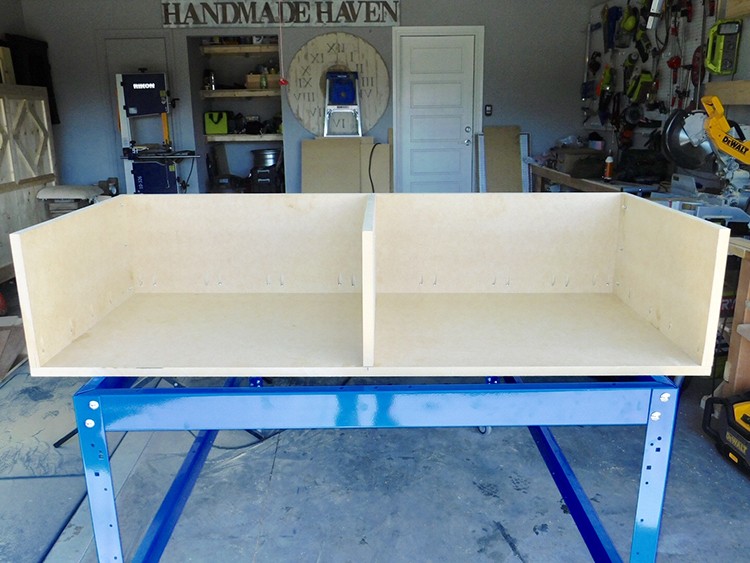
First I attached the (52 x 10½ in.) hearth backing to the (52 x 21 in.) hearth bottom piece using a Kreg Jig on a ¾ in. setting using 1½ in. pocket hole screws and wood glue. I made 16 pocket holes on the bottom of the hearth backing.
Then I attached the left and right (10½ x 20¼ in.) hearth side pieces to the attached base. I made my pocket holes on both the bottom and the adjoining side of the side pieces.
Next I attached the (10½ x 20¼ in.) middle hearth piece to the assembled base. I made my pocket holes on both the bottom and the adjoining side of the middle piece. I alternated pocket holes between sides. I did five pocket holes on the right side and five on the left.

Step 2
I began assembling drawers by attaching the two (19½ x 9 in.) drawer sides to the two (22⅜ x 9-1/16 in.) drawer faces using a Kreg jig on a ¾ in. setting using 1½ in. pocket hole screws and wood glue. I made my pocket holes on the drawer pieces.
Note: Pocket holes should be made on the side facing outward so that the drawer is free of holes.
Then I attached the ¼ in. MDF back board to the bottom of the drawer using a staple gun and wood glue.

Step 3
To add the drawer slides, I clamped a Kreg Jig Drawer Slide Jig to the side of the assembled base and screwed in the drawer slide. Screws were provided in the drawer slides I purchased.
I did this for all four sides.

Step 4
After adding the drawer slides, I set the drawer on top of ¾ in. MDF pieces and pulled out the drawer slide just enough so that the first two holes on the drawer slides were showing and screwed the drawer slides to the drawer.
I then slowly pulled the drawer slide out to the second set of holes and screwed the middle of the slide to the drawer.
Once the two sets of holes were screwed to the drawer, I pulled the slides out of the drawer slide to screw the additional back holes to the drawer and repeated for the other drawer.
Once the drawer slides were attached to both drawers, I slid my drawers back in.

Step 5
Next, I attached the face of the drawers using a brad nailer and wood glue. I sat the face on a ¾ in. piece of MDF to leave a gap from the ground.
I also measured it so that there was a gap on the top so the drawer top wouldn’t hit the top piece.
The drawers should slide out together when the front face is pulled.

Step 6
Next, I attached the hearth (front and back) top to the assembled base using a nail gun and wood glue.
Tip: Use a speed square as a guide to staple evenly down the top of the hearth.
Step 7
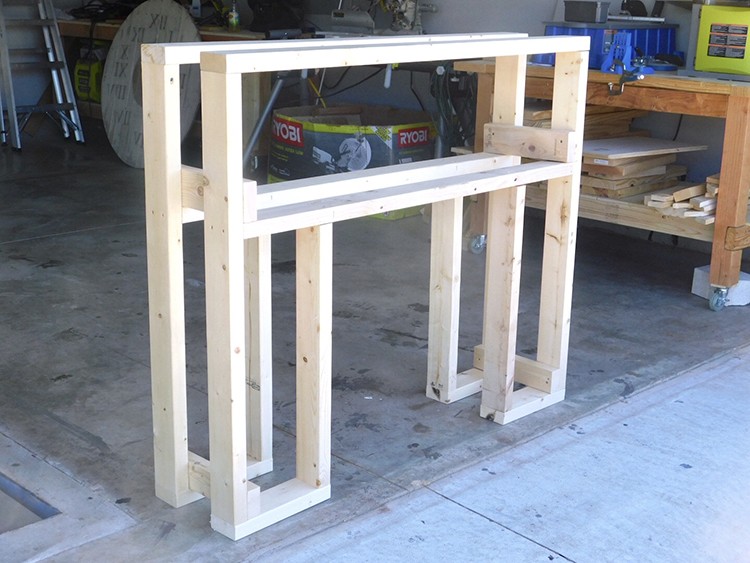
First I attached the two (40 in.) 2 x 4s to the (51 in.) 2 x 4 using 2½ in. wood screws and wood glue.
Next, I attached the (12 in.) 2 x 4s to the assembled frame using 2½ in. wood screws and wood glue.
Then I attached the (26 in.) 2 x 4s to the assembled frame using 2½ in. wood screws and wood glue.
Finally, I attached the (48 in.) 2 x 4 to the assembled frame using 2½ in. wood screws and wood glue.
I repeated this for the other side of the frame and then attached the two frame sides together by screwing four (12 in.) 2 x 4s to the sides.

Step 8
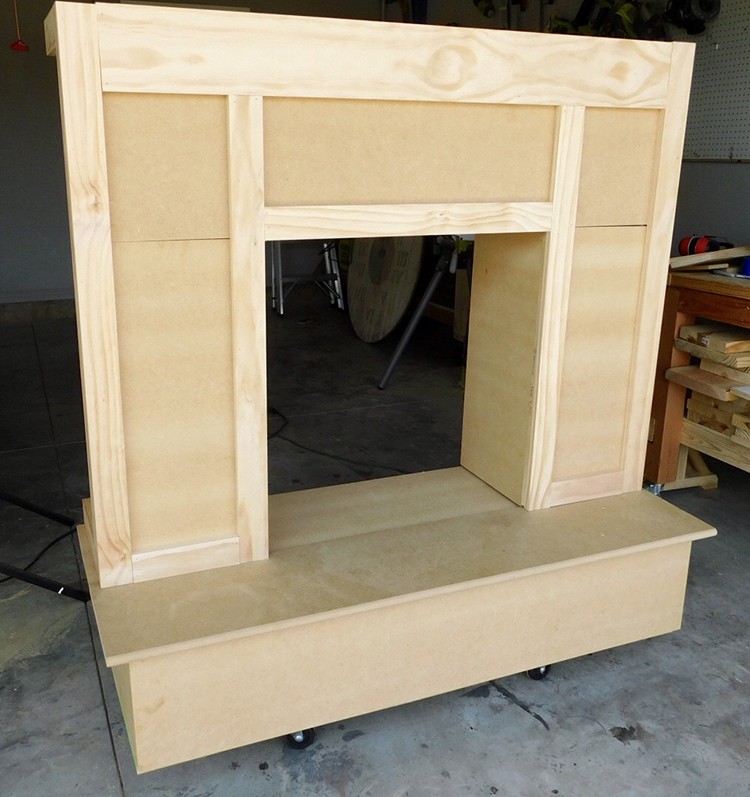
I first covered the inside of the frame, starting with the top and then the two sides using wood glue and brad nails. I flipped the frame upside down to do this step, as it was easier for me.
I then covered the two outer sides of the frame using wood glue and brad nails and placed the frame on top of the hearth and screwed it down using wood glue and 2 in. wood screws.

Step 9
I then covered the bottom front of the frame, and then the top front of the frame using wood glue and brad nails
Step 10
I then began trimming out the two sides of the fireplace using wood glue and brad nails. It is important to start trimming with the sides first.
Next, I trimmed out the front of the frame, starting with the two outer vertical sides, followed by the top, the two vertical inner pieces, and then the middle horizontal piece using wood glue and brad nails.
Step 11
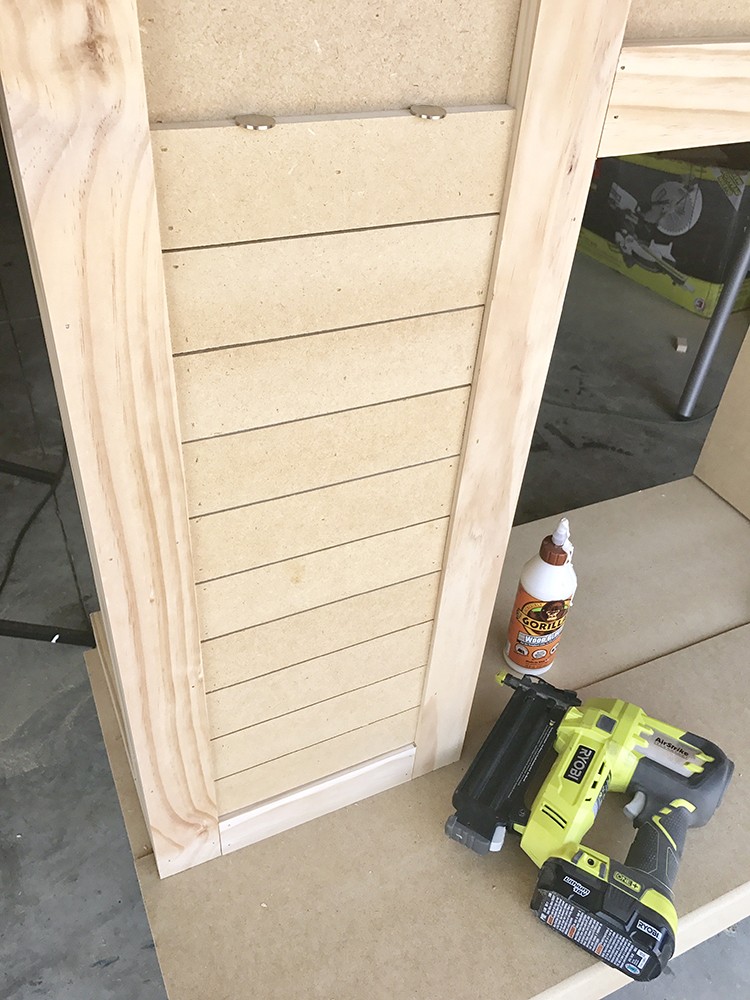
I began adding the ½ in. MDF shiplap trim using wood glue and brad nails.
To space the trim shiplap pieces out, I used two nickels to place in between each shiplap piece.
I started from the bottom and worked my way to the top.
I inserted a space with the nickels before placing the first shiplap piece trim, but I would suggest making it flush with the bottom to prevent more caulking.

Your piece should now look like this and be ready for paint prepping.

Step 12
DAP is one of my favorite products, I use it on all my builds. My favorite part about this product is that it goes on pink and dries to a natural color. That way, you know exactly when to sand. I used this DAP Plastic Wood-X, to fill all the nail holes and adjoining board cracks.
Step 13
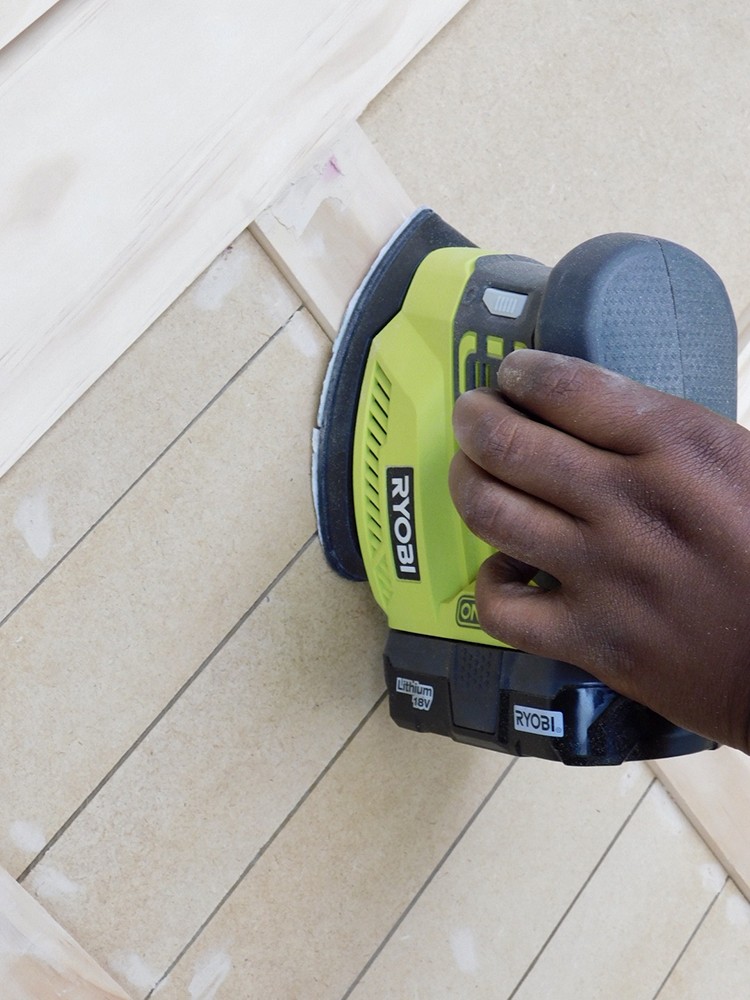
Once the filler was dried, I sanded the fireplace and all the filled holes.
Once I was finish sanding, I blew/wiped away all the dust to prepare for caulking.
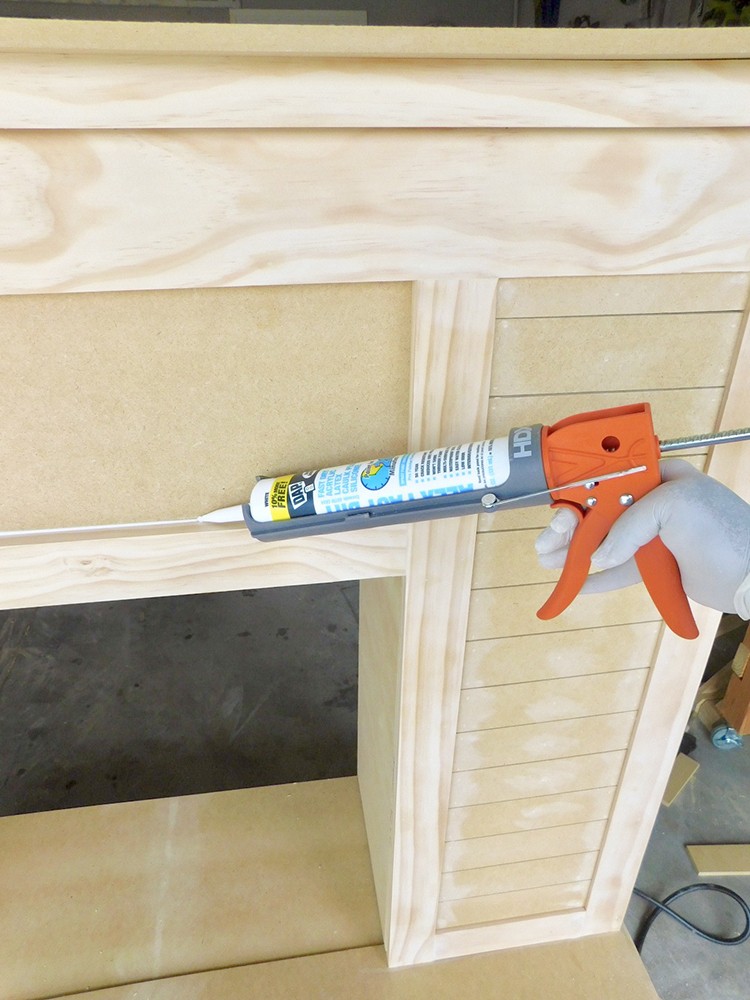
Step 14
If you’re not used to caulking, this can get a little messy. Once you get the hang of it, it’s a breeze, though. I used this DAP Alex Fast Dry Caulk to seal all the corners on the trim. This will ensure a clean look when painting.

Step 15
Once the caulk was dry, I began mixing my paint for the Flexio sprayer. I used the smaller container that came with the paint sprayer and filled it to the top.
Before pouring the paint in, I poured in a small drop of water to thin out the paint. If you want to test if your paint is thinned enough, run it through a funnel. If it runs smoothly, it’s thinned enough. It doesn’t take a lot!
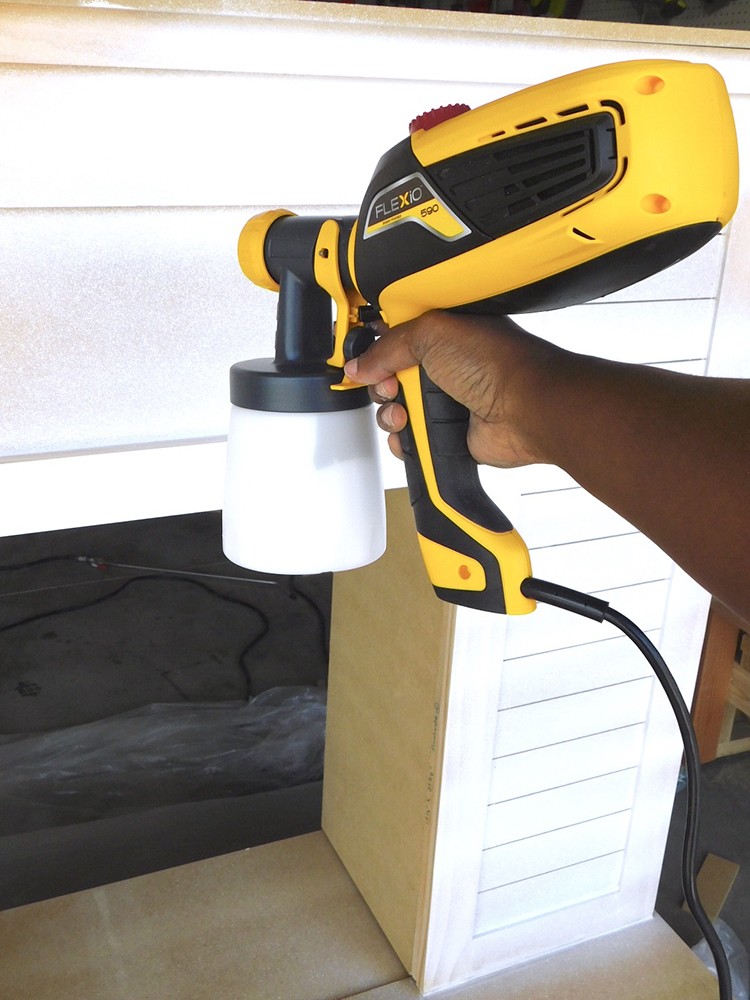
Step 16
If you don’t have a sprayer and you paint a lot, I would highly suggest getting one. The ease of this thing and the clean look you get is invaluable.
I put the air setting on 5 in. and did three light coats of paint. I waited two hours before each coat. I did notice that it often splats paint when you first trigger it, so I made sure I sprayed away from the fireplace when I first triggered it and then pointed it to the fireplace.
When you’re spraying don’t spray in one direct spot; try spraying in strokes for the best look. I also kept a foam brush handy to wipe up any splatter because in my experience, no matter what sprayer you use, there will be some.
Step 17
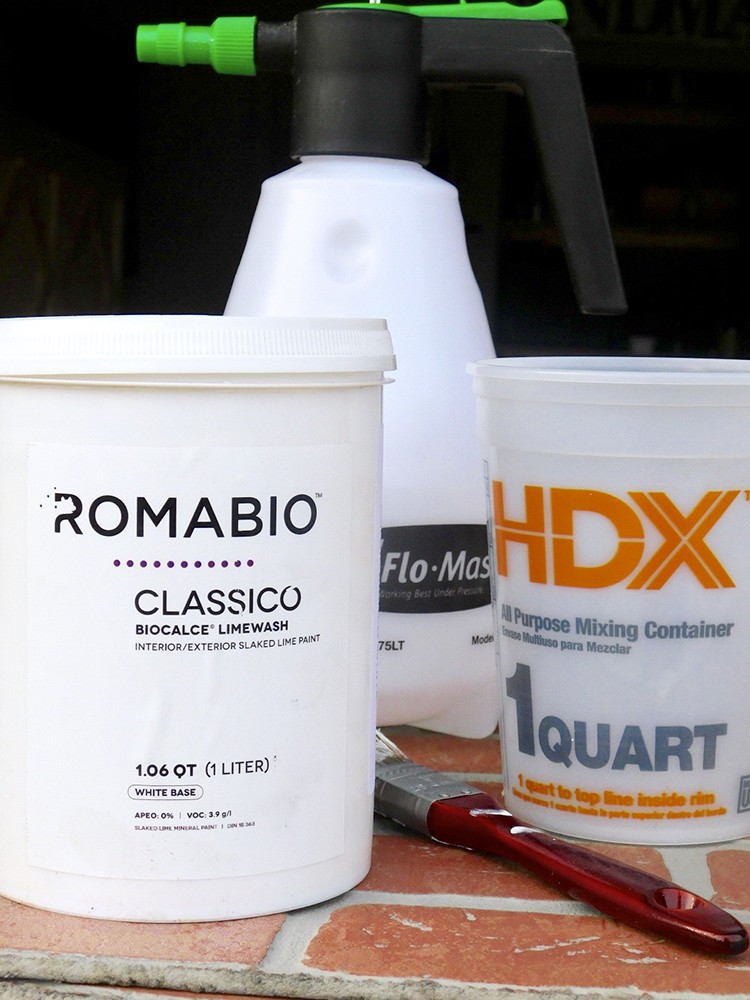
While the last coat was drying, I starting painting the faux brick. (I fitted and cut the brick panels before I started painting.)
I started off by diluting the limewash. This limewash was super fun to paint with. It really helped make the faux brick come to life. I filled the mixing cup halfway with the limewash and then mixed in some water and stirred until the limewash had a good consistency.

Step 18
Once the limewash was mixed, I covered the whole faux brick with it using a bristle brush. I did two light coats right after each other. Be careful not to make it too gunky.

Step 19
Once the limewash was 90 percent dry I sprayed the faux brick with a water bottle and begin wiping away the limewash in certain areas to get my desired distressed look.

Step 20
This step isn’t necessary, but I wanted to add a little more character to my faux brick and break up some of the white. I used a foam brush to dab on some Rust-Oleum Aged Gray Chalk Paint. I love how it turned out!
Once the paint was dry, I stapled the first piece of faux brick to the back of the fireplace and used a brad nailer to nail the side faux bricks to the fireplace. I used the caulk to fill the gaps below.
I then stapled the ¼ in. backing to the fireplace.
Step 21
Anchor your new DIY faux fireplace to the wall and style it to your liking.
There are so many ways you can decorate a fireplace, so I look forward to decorating it out each season!

I really love how the bricked turn out. It really brings this faux fireplace to life.

With the added storage in my DIY faux fireplace, I can store all of my DVDs and books, which is a big help keeping my living room free of clutter.
The post How To Build a DIY Faux Fireplace with Extra Storage appeared first on The Home Depot Blog.

