
DIY Potting Bench + Apple Cider Bar
STEP 1: Make a plan + gather supplies
I drew a custom plan for this potting bench that gave me maximum table space for working and setting up an impromptu party buffet. I gave it sweet willow and copper details to add both style and function.

The dimensions for my potting bench are 6′ tall by 4′ wide and 2′ deep.
Here are the supplies you will need to make your own:
2 – 4″x 4″ x 8′ Posts
5 – 2″ x 4″ x 93″ Wood Studs
1 – 1″ x 8″ x 6′ Board
2 – 1/2″ x 24″ x 48″ Plywood Sheets
2 – 6″ x 8″ Black Celtic Scroll Brackets
1 – 1/2″ x 5′ Type M Copper Pipe
1 – 48″ x 120″ Bamboo Expandable Willow Fence or Trellis
2 – 4″ x 4″ Copper Pyramid Post Cap
4 – 4″ Swivel with Brake Non-Marking Rubber Casters
1 pack – 1-13/16″ Flat Black Single Prong Robe Hook Value Pack
3 – 1-3/4″ (45mm) Bronze with Copper Highlights Oversized Round Cabinet Knob
Saw for Cutting Wood
Hand Sander for Sanding Wood
Drill + Drill Bits
Wood Screws
Level
Wood Glue
3/4 in. Hot-Dip Galvanized Staples
Hammer
Jr. Tube Cutter for Cutting Copper Pipe
Construction Adhesive
STEP 2: Cut your wood
OK, now it’s time to get cutting! First, cut your two 4″ x 4″ x 8′ posts to 5′ 6″ tall. This will give you two remaining pieces that are 2′ 6″ tall – these will be for your front legs.

Cut four of your 2″ x 4″ by 93″ boards to 48″ in length. You will end up with four 48″ inch boards and four 45″ boards. Set your 48″ boards aside.
Cut all four of your remaining 45″ boards into 21″ pieces. You will now have eight 21″ piece boards.
Cut your remaining 2″ x 4″ x 93″ board to 42″ – keep the 42″ piece and put the remaining piece in your wood stash for a future project.
Cut 1″ x 8″ x 6′ piece of wood to 1″ x 8″ x 4′. This is for your top shelf. Put the remaining two feet piece aside for a future project.
Give all of your wood a quick once over with your hand sander for a nice, more pro looking finish. Plus, it reduces the chances of you giving yourself a splinter while you’re working!

STEP 3: Assemble your boxes
Now you want to begin assembling the boxes, these are the supports for your countertop and your shelf.
Use your drill and appropriate sized drill bit for your wood screws to pre-drill your holes for connecting the wood. To make this easier on me and more uniform, I created a little pattern on paper for where my holes would go. I then placed this on the piece of wood at the end where I needed to drill and drilled through the paper.

I used the same pattern over and over with each piece. It got a little tattered but still useable and really helped keep me on track with my drilling.
You will need holes on each front end of your 48″ pieces and one hole on the forward end of your side pieces.

Connect 21″ side pieces to 48″ long pieces to form a box. Evenly space to 21″ short pieces inside to give your box even greater stability. Be sure to use a level to make sure you are keeping your box nice and square.
STEP 4: Attach boxes to the posts
Now that both of your boxes are assembled it’s time to attach them to the posts. I put my short post legs on the inside of my boxes and attached the back of the boxes to the outside of the back post legs.
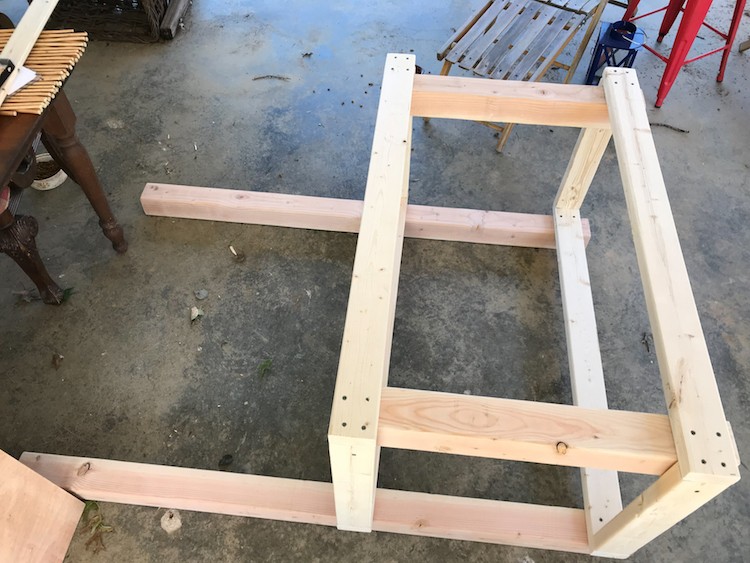
This allowed for the top counter piece to be perfectly flat and flush and require no cutting. Giving me maximum counter space.
You will need to notch out the front corner of your lower shelf but with a jigsaw, this is a simple cut to make.
Attach the front, short legs to the inside of the box first. Remember to use your level to make sure you’re keeping everything nice and even.

Then, lay your tall back leg posts on the ground, and balance your short box legs on a chair or have a friend support them while you attach the box to the back legs. I found it was easier to do it like this than try to support those giant (and heavy!) back legs!
STEP 5: Attach casters to the posts
While your potting bench is laying on its back, drill your pilot holes for your casters (and go ahead and attach them too!)

Again, use a pattern if necessary to make it easier.
Be sure to lock your wheels once you raise the bench to its feet so it doesn’t roll around on you until your ready!
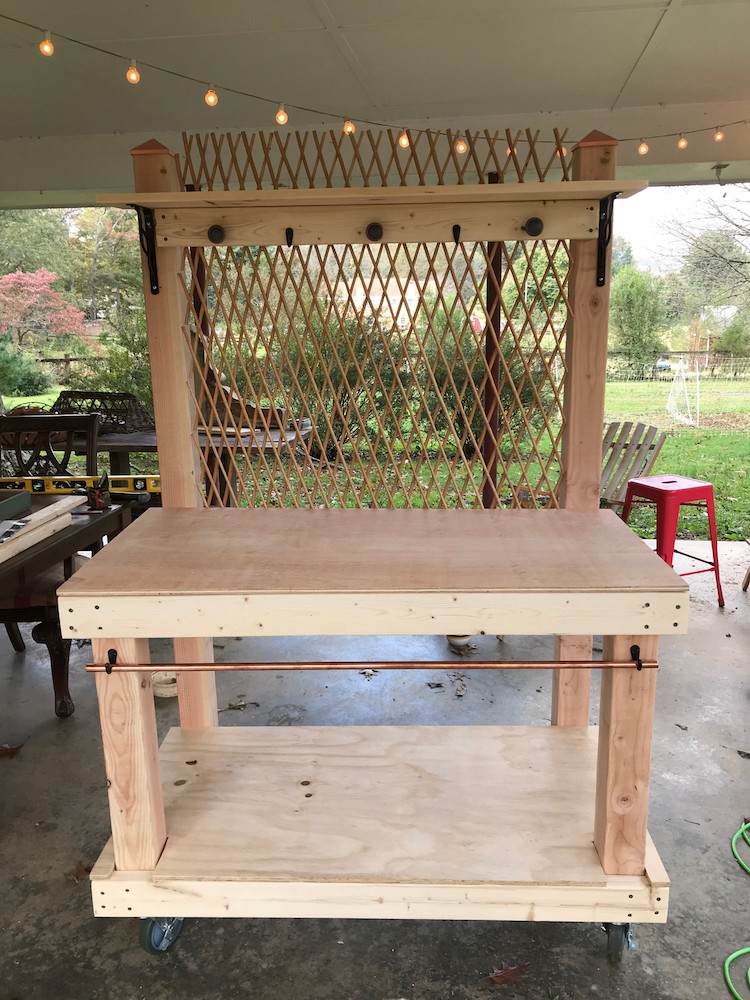
STEP 6: Attach countertop + shelves
Now that your potting bench is on its feet, we want to add our countertop and storage shelves.
Hold one piece of plywood up against the front legs to determine the spacing for your cuts to allow for the posts on the bottom shelf.
Use your jigsaw to cut out those 2 notches on the front long end of the plywood. Apply wood glue to the top of the box and place the notched bottom shelf. Add wood screws to help secure the shelf to the box.
Apply wood glue to the top of the top box and place uncut plywood onto it. Add wood screws for extra hold. You now have a smooth wood top!
Now we want to add the brackets to the back posts to hold a smaller shelf.

First, attach your 42″ piece of 2″ x 4″ between your back posts at the height you desire your top shelf. I put mine 6″ from the top of the posts. Since it is only 42″ wide you want to center it leaving some room for the shelf brackets to go on each side on the posts. This piece of wood is going to help your shelf not sag over time.
Now, attach the brackets to the posts. Remember, drilling pilot holes can really help this process go more smoothly.
Once your brackets are in place, put your piece of 1″ x 8″ x 4′ top shelf wood onto the brackets. Use regular wood screws to attach the back edge of the shelf to the base piece of wood. Then, use the small nails that came with your brackets to attach the bracket to the wood shelf.
STEP 7: Finishing touches
Now you just have a few finishing touches to add!
TRELLIS:
First, let’s attach the trellis to the back of our bench. This is super simple to attach using 3/4″ staples that you tap in with a hammer. Simply stretch the trellis open and place a staple over an “x” juncture of the trellis and tap the staple into the back of the shelf bracket. Then repeat this step on the bottom of the trellis, attaching it to the back of the top “box.” Finally, repeat the top and bottom steps on the opposite side. You can add a couple more staples in the middle for extra security.
KNOB/HOOK DETAILS:
I wanted to make that shelf bracket be fun and functional by adding some cute knob and hook details. These are great for hanging tools as well as cute signs like I did for my Apple Cider Bar!

Simply choose your hook and knob placement on the front of the wood. Use a drill to pre-dill your holes and then attach with your screws. Easy! I used three knobs and two hooks on this piece.
COPPER DRAPERY ROD:
I then put two hooks under the countertop on the front legs to act as holders for a piece of copper pipe that I turned into an impromptu drapery rod. I decided to add this because I realized that there are going to be many times when I’m storing bags of potting soil or other more utilitarian items and would prefer to hide them with a pretty piece of fabric. This way, I’m adding a touch of shiny copper which is pretty and perfectly on-trend at the moment but it can easily move out of the way if I’m wrestling large items or just get tired of the rod.
The rod comes in a 5′ length so I used a Jr. Tube cutter to cut the pipe. Simply open the width of the “mouth” of the tube cutter and insert the tube into it. Tighten the blade onto the pipe and begin to turn the pipe. This will score the pipe. Continue turning and tightening as you can. In just a moment or two, you will have cut your pipe. I was worried this step would be hard but it was actually easy! Yay!
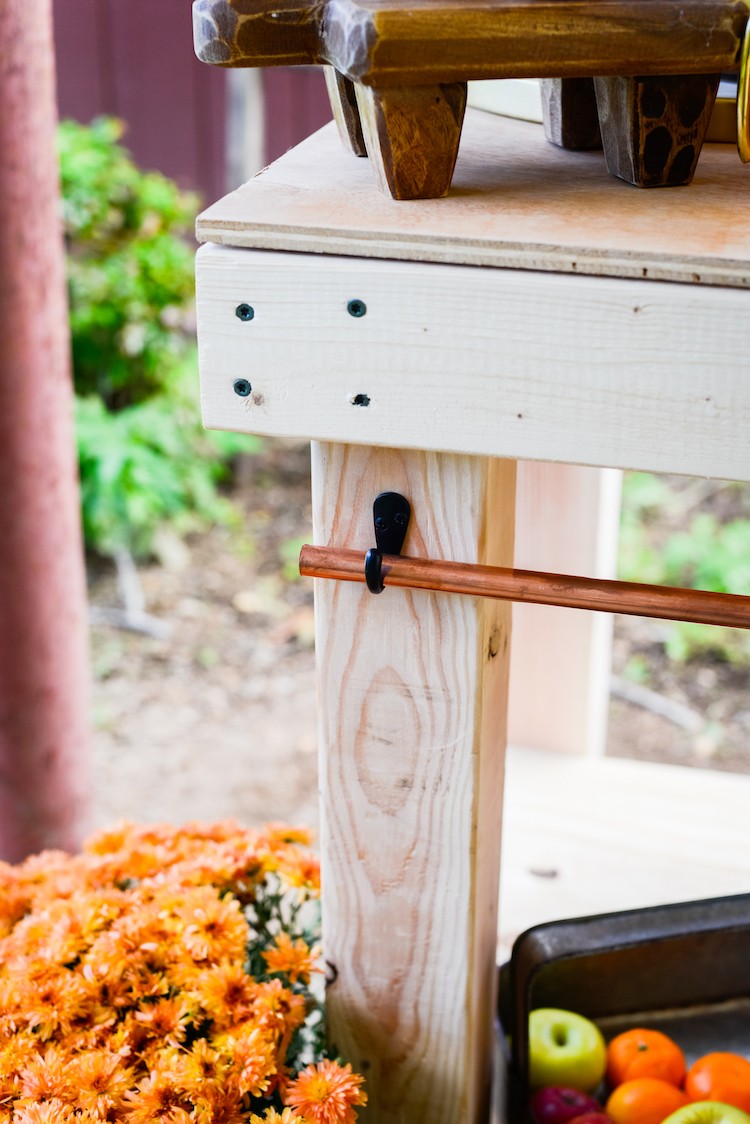
The hooks come in a pack of six – you can add the remaining two hooks on the side of the bench for extra storage or use them on another project.
COPPER POST CAPS:
To repeat a touch of the copper accent and to give my posts a more finished look I decided to place two post caps on the tall posts.
To attach each post cap style to the post, apply an exterior-grade construction adhesive to the underside of the post cap and place firmly on the post.
And there you have it, a beautiful and functional DIY potting bench!
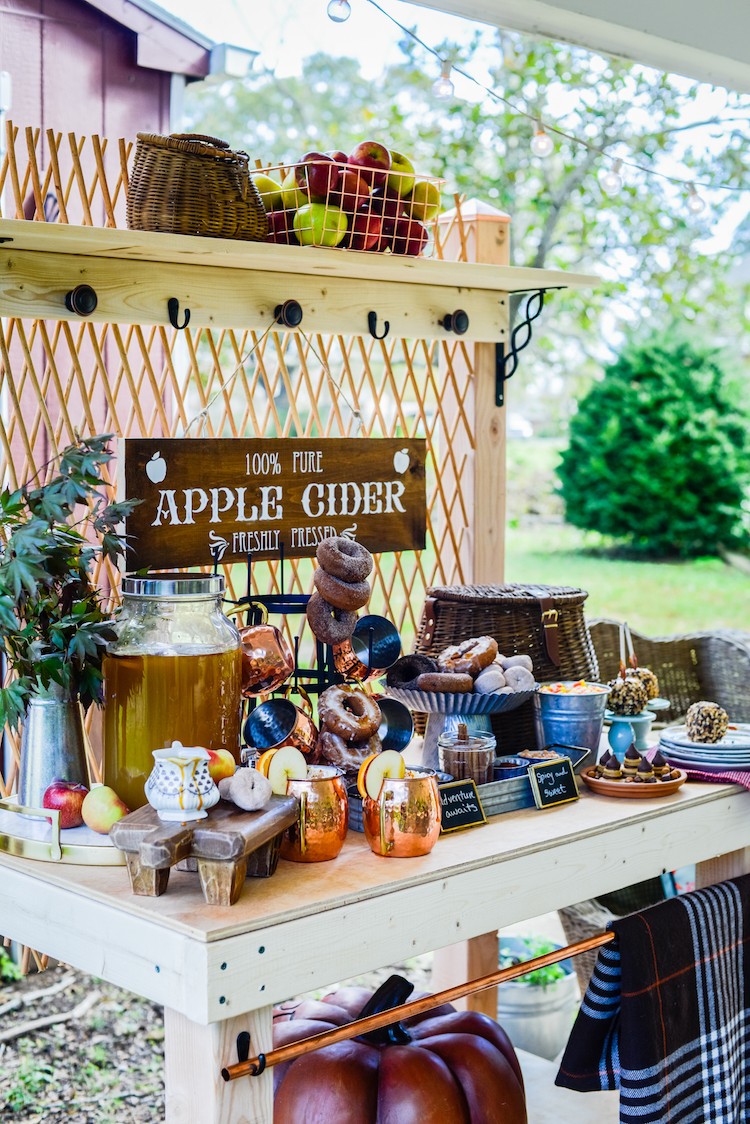
Styling Your DIY Potting Bench as an Apple Cider Bar
OK, now let’s get to the fun part – styling your new potting bench as an Apple Cider Bar for fall!
First I made this fun and easy DIY Apple Cider sign – please visit my blog CelebratingEverydayLife.com/
Signs like this are easy to make and really take your party styling up a notch.
Next, I began thinking about textures and colors that evoke fall. I gathered a couple of cozy throws, a beautiful pillow from Home Depot, and a mix of platters and baskets to include.

I like to create DIY self-serve stations like this when entertaining because it’s a great way to engage guests and help them feel at ease. Sitting around awkwardly is never a good thing. Having a station gives guests an anchor point.
I chose to serve my cider in a glass dispenser. If you are planning to serve hot cider consider a thermal dispenser instead. Glass like this can break with very hot beverages so watch out for that. Be sure to add some slices of apples, oranges and some cinnamon sticks for extra visual appeal to your cider jar.

Copper is a terrific choice for fall and HomeDepot.com has a tremendous selection of copper mugs for you to choose from. You can get monogrammed mugs or plain ones like these. When hung on a mug rack like the one I used here, they do double duty and are both festive and functional.

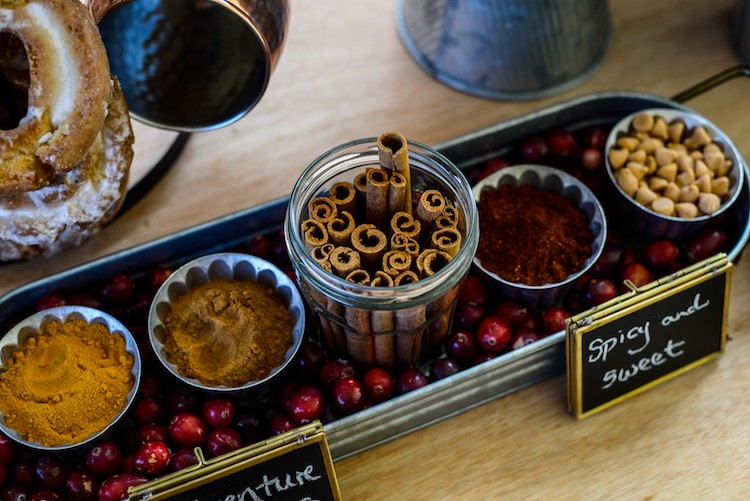
Toppings just make things better, don’t they? Let guests have fun customizing their drink with a mix of garnishes ranging from sweet to exotic flavors. Here I’ve used cinnamon – both sticks and ground options, sweet butterscotch chips, and some ground chili powder for those who are feeling extra adventurous. There is, of course, delicious caramel sauce they can pour on and even some whipped cream to make their cider over the top delectable.
Consider adding some sweet treats to further tempt your friends. Here I’ve gathered a few favorite flavors of donuts and displayed them both on a galvanized pedestal and hung them from some hooks on our mug rack. Presenting old favorites in a fun way is a simple idea that adds instant pizzaz to your gathering.
Apple slices (dipped in lemon water to keep them from turning brown) and some orange slices make pretty garnishes for the cider cups too.
A few candied apples and some grab and go snacks like candy corn mixed with salted peanuts are all you need to delight your friends.

Finally, fill in your apple cider bar display with baskets of apples, oranges, fall colored mums, and even some pumpkins for two. A mix of metal and woven baskets will add interest and lend fall charm to your setting.

I encourage you to look around your home for the foundational supplies to create your bar and then visit your local Home Depot or HomeDepot.com for everything else you need to create a beautiful and memorable apple cider bar!
The post DIY Potting Bench + Apple Cider Bar appeared first on The Home Depot Blog.

