
Jaime Costiglio shares a fresh take on a traditional Holiday staple. Using painted wood and smart ShowHome outdoor holiday lights exclusive to The Home Depot, Jaime creates a not-so-average wreath that will transform any outdoor space for the season.
Holiday How-To’s: DIY Wood Wreath Cut Out
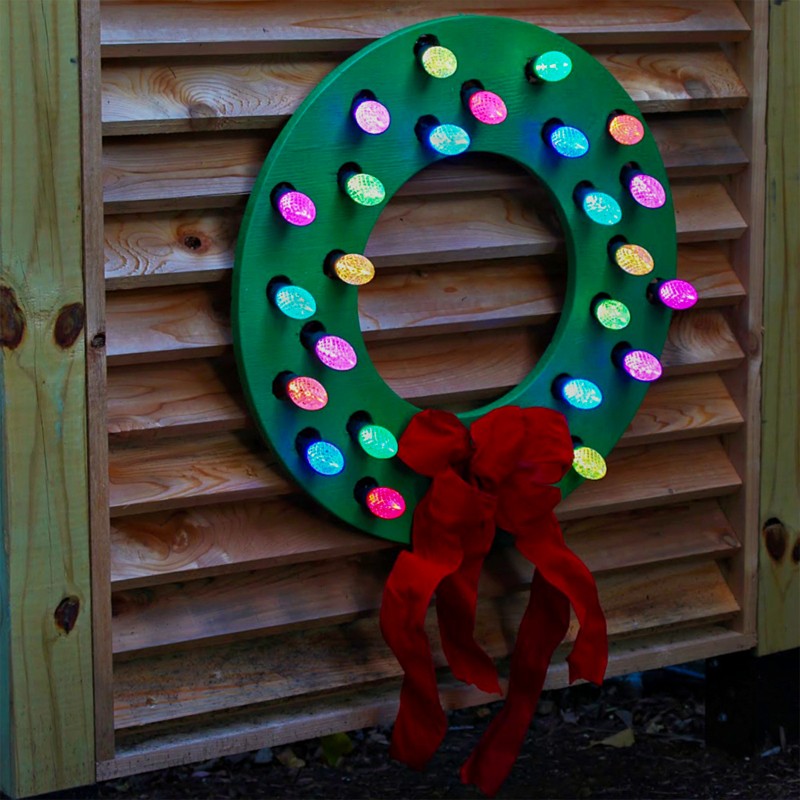
Let’s have fun with outdoor lights and make a magical holiday scene. This wood wreath cut out project is simple yet so effective because the lights do all the work. Imagine multiple wreaths lined up on your porch railing or hanging from your windows?

I love the marquee cartoon style of the flat painted wood wreath with the light bulbs sticking forwards. It’s whimsical, fresh and not your average holiday wreath. And bonus these lights are all controlled by the Holiday show home app so once you set up your wreaths everything is controlled from your phone.
Below you will find the step by step instructions to create this outdoor wreath. Please read through the steps entirely before beginning and always follow all safety precautions when using power tools. Note: one handy panel (2 x 4-ft.) piece of plywood can fit two wreaths.
Supplies:
- (1) ¾-in. pressure treated plywood handy panel (2 x 4-ft.)
- (1) set C9 LED app lights multi color (24 lights)
- (1) wired red bow
- Black or green zip ties
- (1) set D ring hangers & hanging wire
- (1) box ½-in. staples
- Exterior green paint & paintbrush
Tools:
- Router (or jigsaw)
- Circle jig
- Measuring tape & pencil
- Drill and drill bits
- 1¼-in. spade bit
- staple gun (tacker)
Cut list:
- ¾-in. plywood
- 23-in. diameter circle (wreath), with 11-in. diameter hole in center
Step 1

Using a router or jigsaw cut a 23-in. diameter circle from 3/4-in. PT plywood. If using a router and jig mark the plywood at 12-in. in from short side and 12-in. in from long side. Make a hole for nail. Create a circle jig and place nail into hole then swivel jig around nail.
 Step 2
Once large 23-in. diameter circle is cut make a new nail hole in the jig for a 5 ½-in. radius circle. Place the nail through the new hole and into the center of the plywood circle then cut out the middle 11-in. diameter hole.

Step 3
 Don’t paint yet. Attach (2) D ring hangers onto back upper portion and insert hanging wire through rings.
Step 4

Don’t paint yet. Place the bow in position and using a pencil make 24 circular marks for light bulb holes. Pay attention to D ring hardware on back and avoid marking holes over the hardware.
Step 5
 Don’t paint yet. Using a 1 ¼-in. spade bit drill holes for lights where marked.
Step 6
 Once all holes are drilled, paint the wreath. Use an outdoor green paint and let dry completely before moving onto the next step.
Step 7

Prop wreath edges up on scrap 2 x 4s. Using a staple gun and ½-in. staples place light bulbs down into hole and staple cords on either side. When installing the bulbs I suggest only stapling through 2 or 3 wires at a time to avoid stapling through the wires causing your lights to not work.

The 2 x 4s keep the front of the wreath off the table to allow for the light bulb to hang down while you are installing all the bulbs.
Step 8

After all the lights are installed go back through and attach zip ties to the hook portion of the light housing. Then secure the zip tie firmly to the back of the wreath using staples which keeps the bulb in the perfect position facing straight out. Without the zip tie the bulb is a bit wobbly.
FINAL DIY WOOD WREATH

For more Holiday inspiration, see other articles in our Holiday Style Challenge series.
The post Holiday How-To’s: DIY Wood Wreath Cut Out appeared first on The Home Depot Blog.

